
Extension Sections
Dashboard
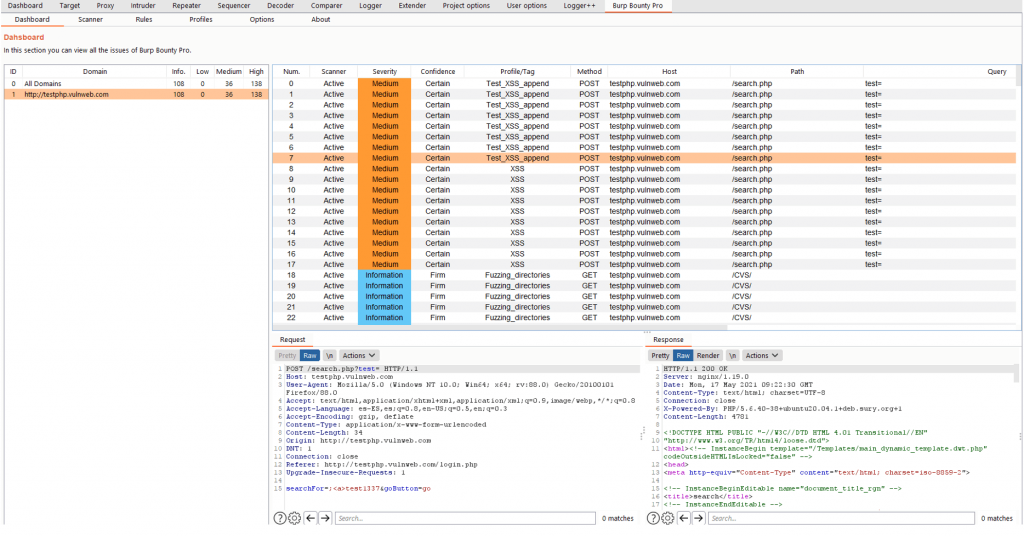
In the “Dashboard” tab you will see the vulnerabilities detected by Burp Bounty Pro scanners, both active and passive. You can change the domain and see only the issues belonging to that domain.
Scanner
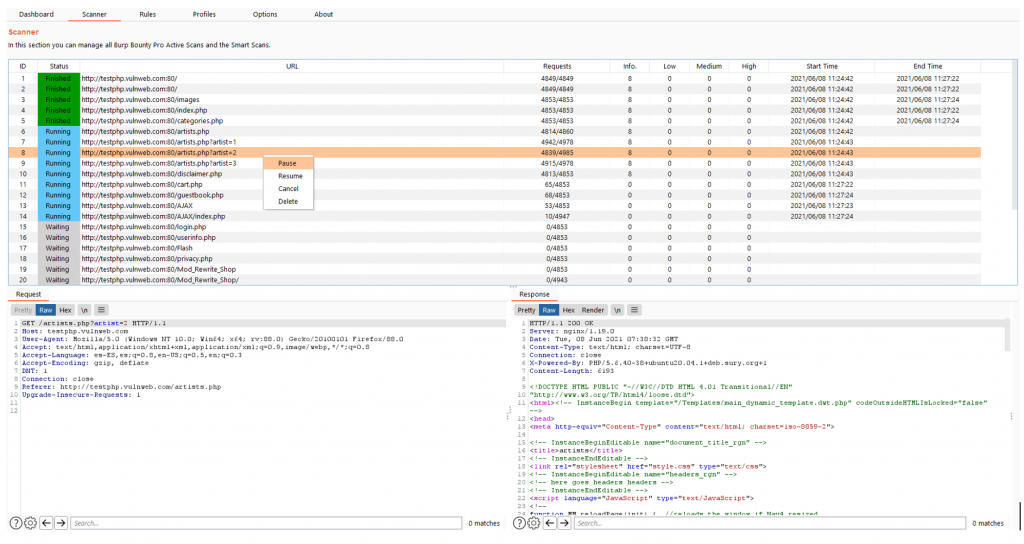
In the “Scanner” tab, you will be able to see the scans carried out or in progress. In this section you can see the “status” of each endpoint, you can select one or multiple scans and “pause”, “resume” or “cancel” them.
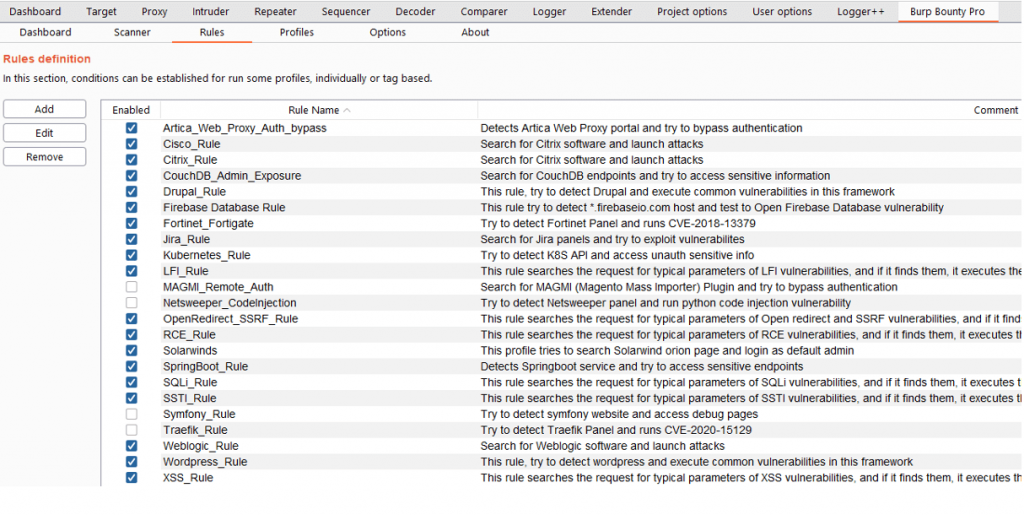
Rules
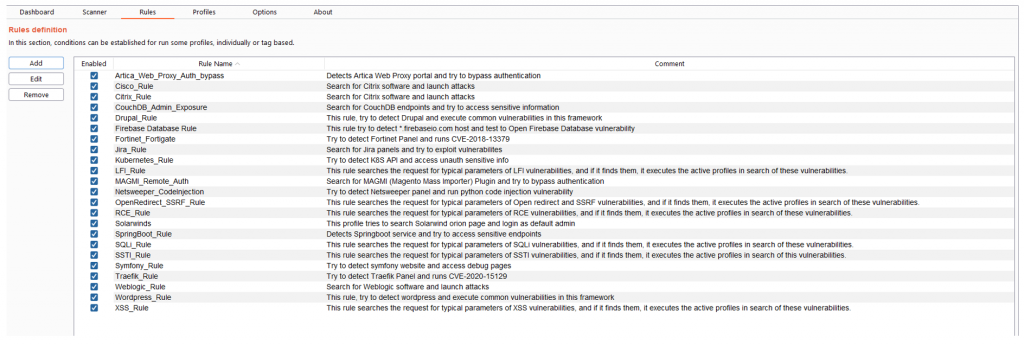
In the tab “Rules” you can see the rules that will be used in the Smart Scan.
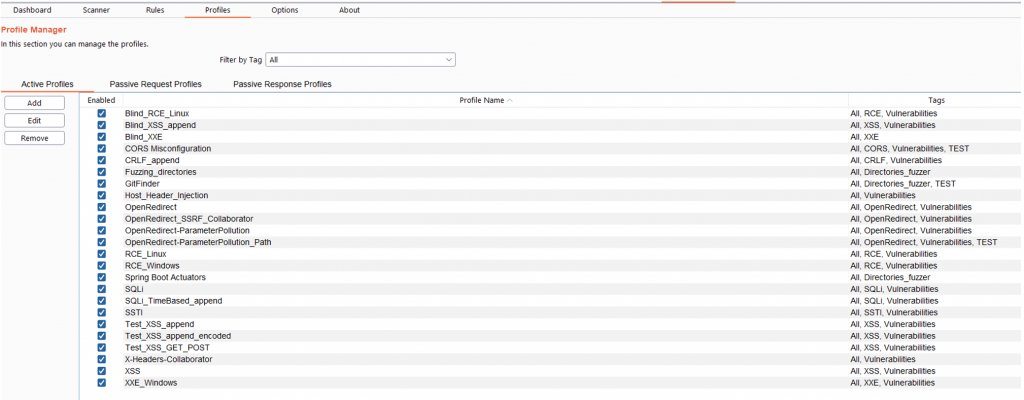
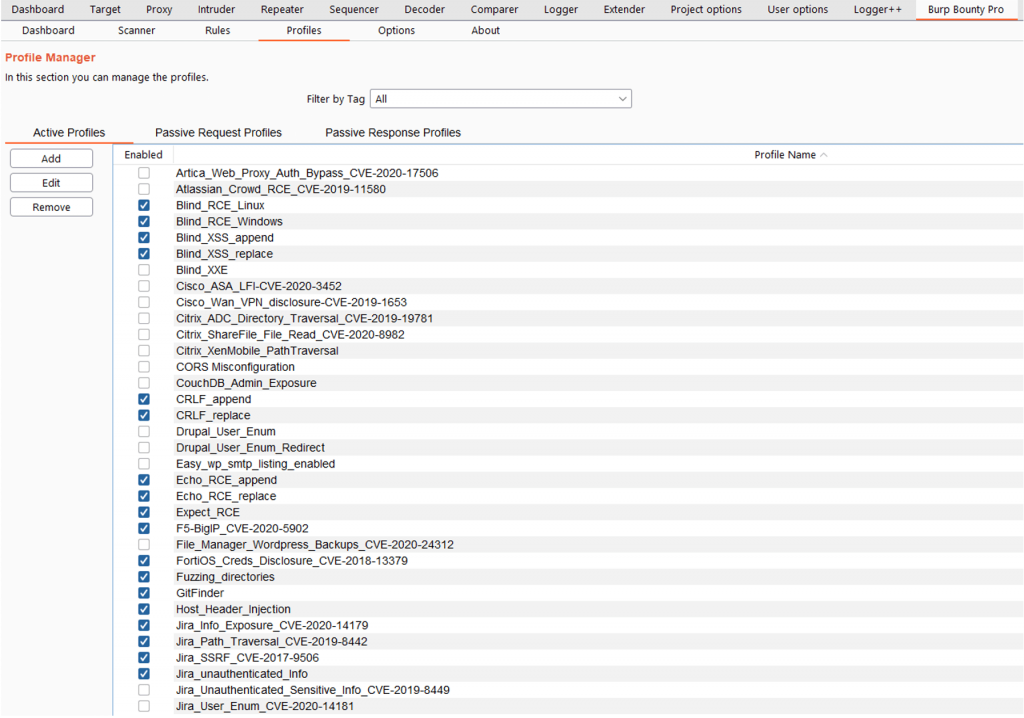
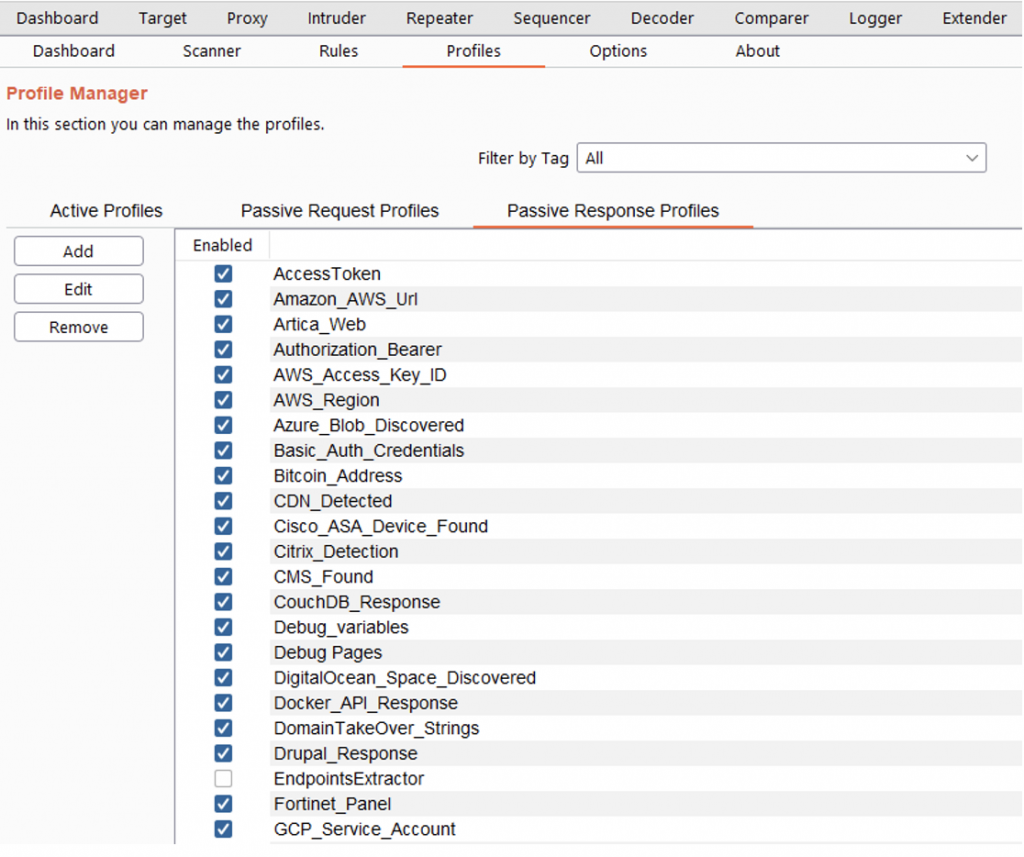
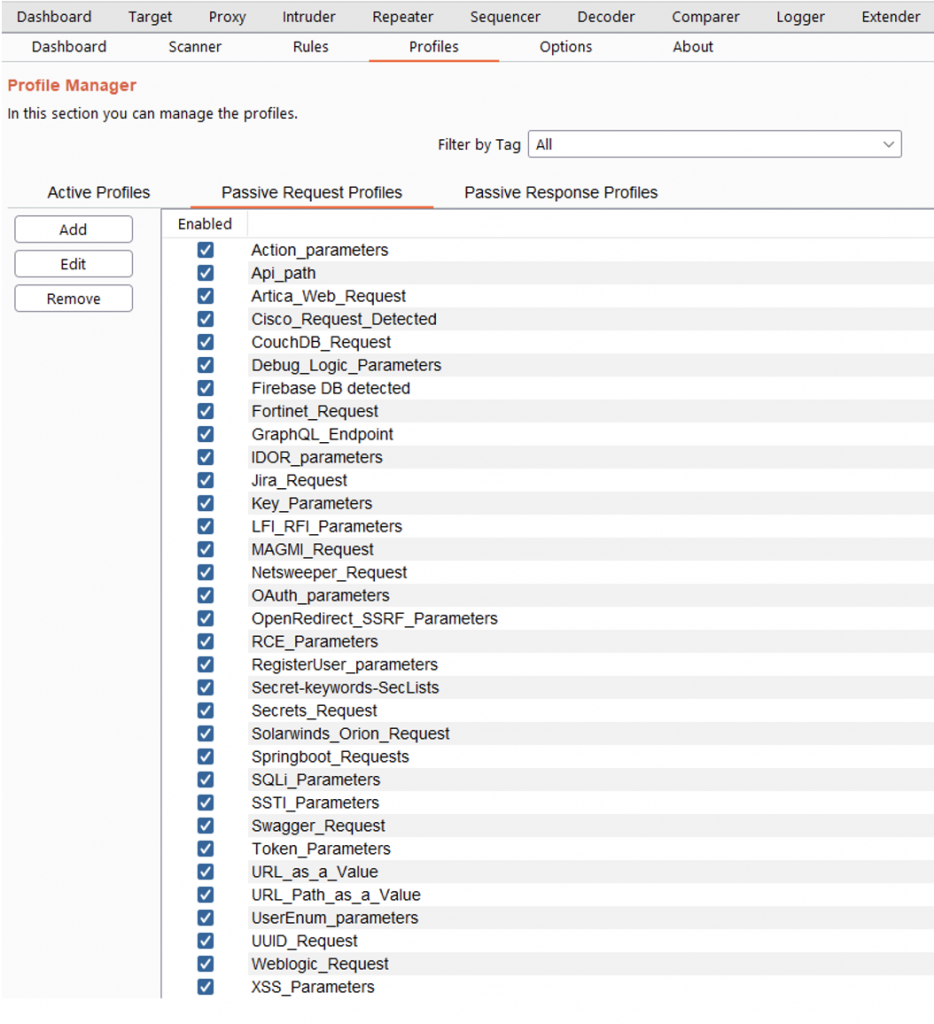
Profiles
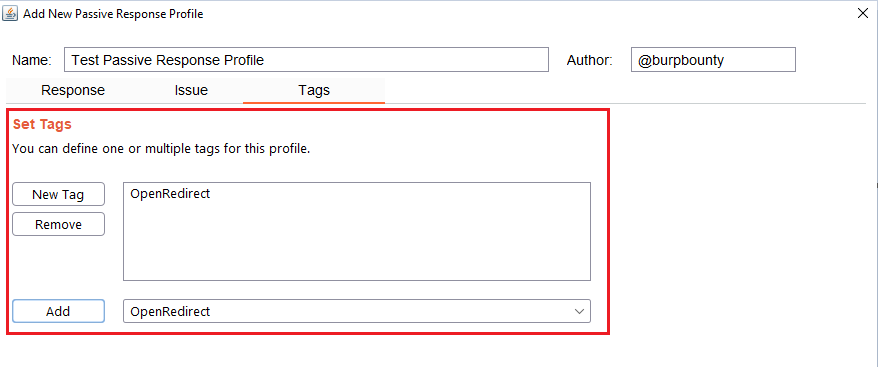
In the tab “Profiles” you can see the active profiles, passive request and passive response. In this section you can add new profiles or edit existing ones.
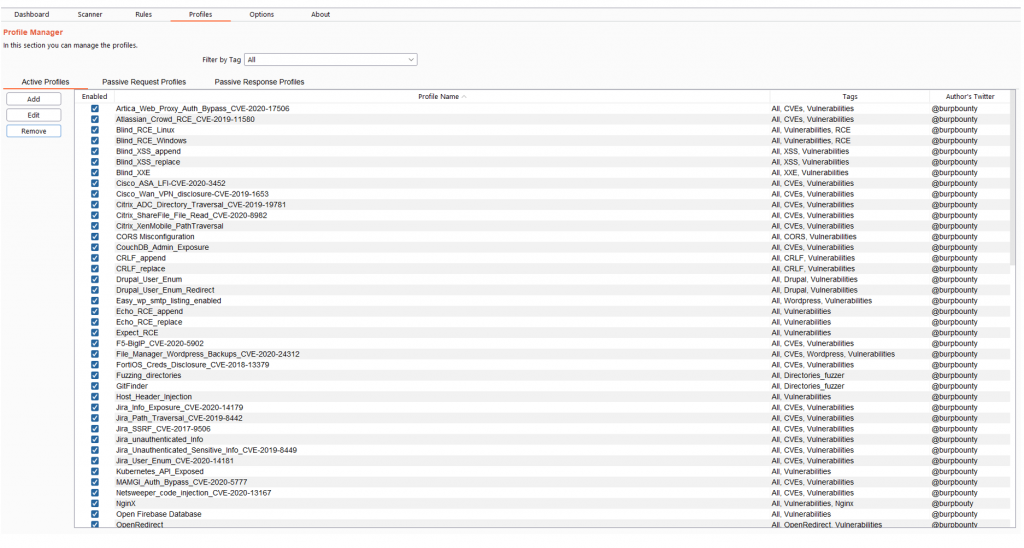
In this section you can also activate or deactivate one or more profiles by means of the right button.
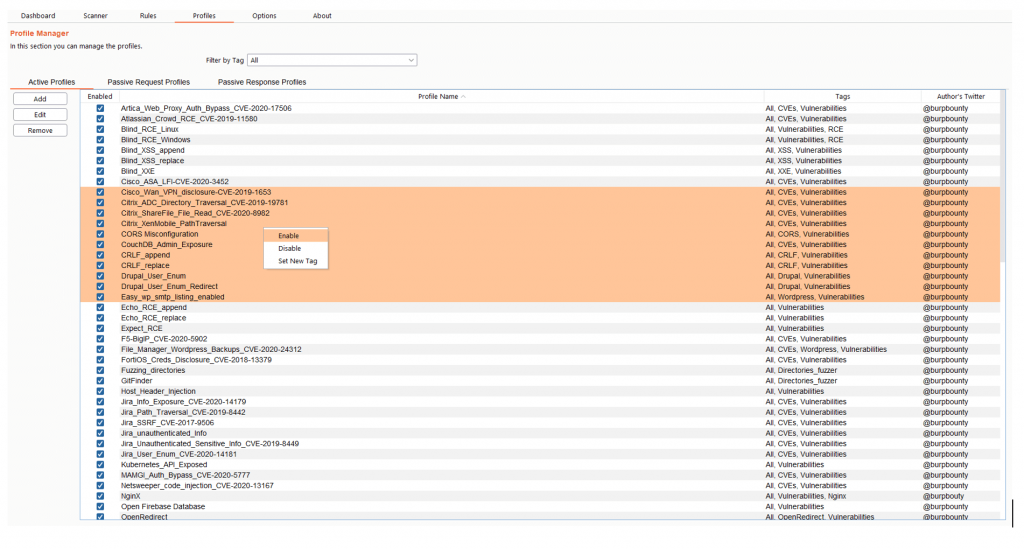
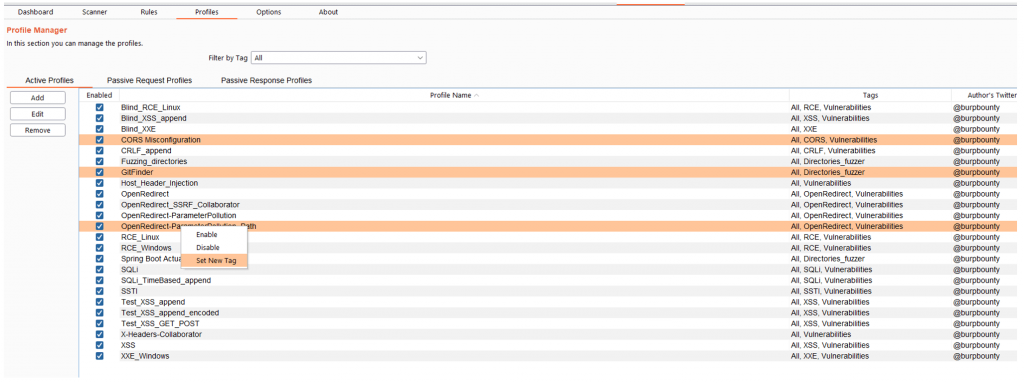
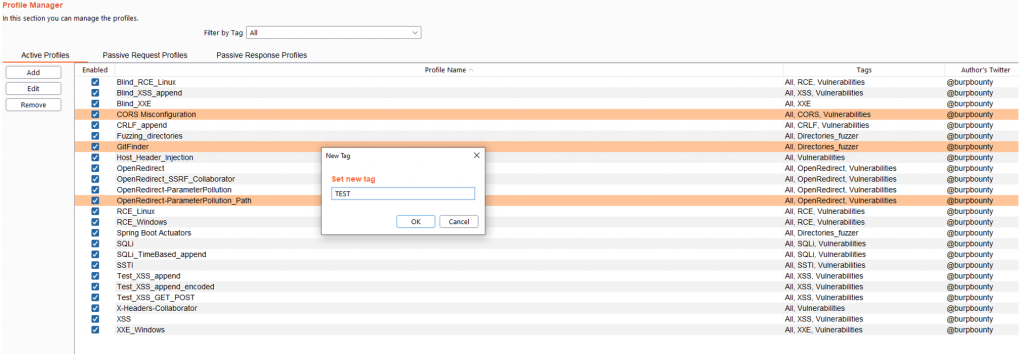
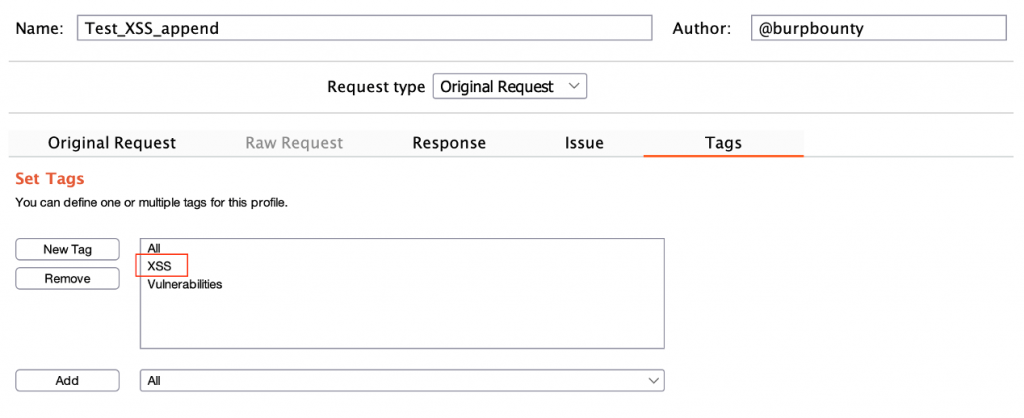
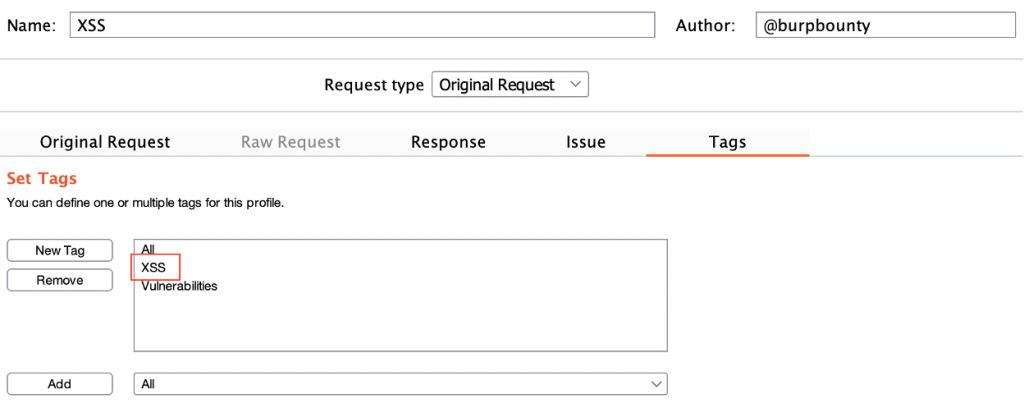
You can add tags to multiples active profiles directly. You have to select the profiles that you want, and then right click->Set New Tag and add the Tag name.
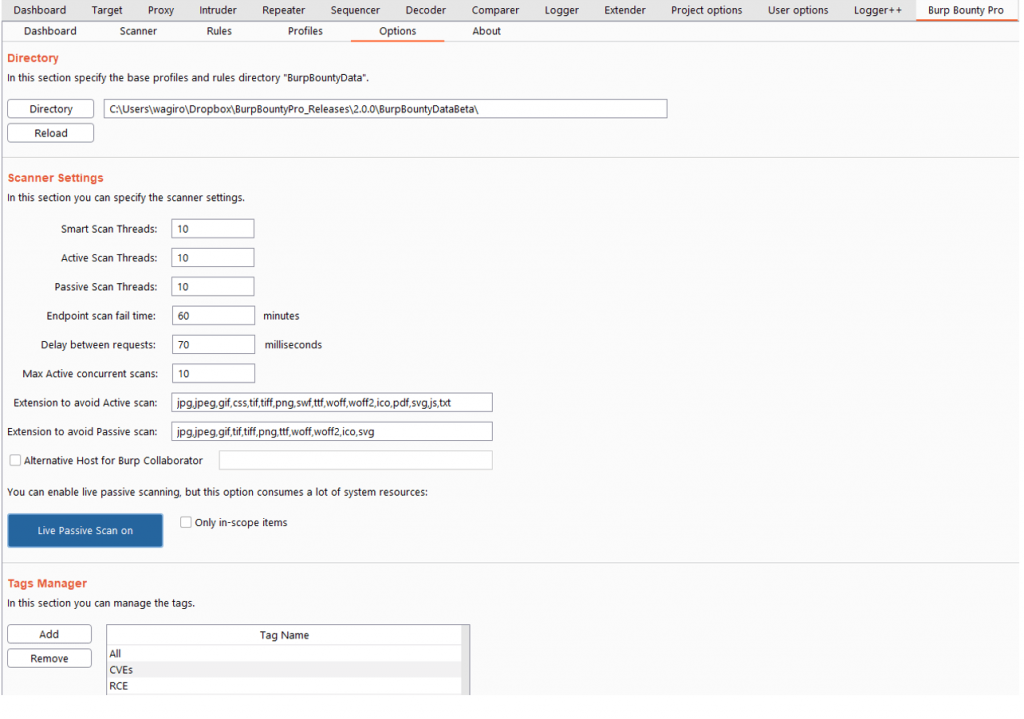
Options
In this section you can specify different options for the extension.
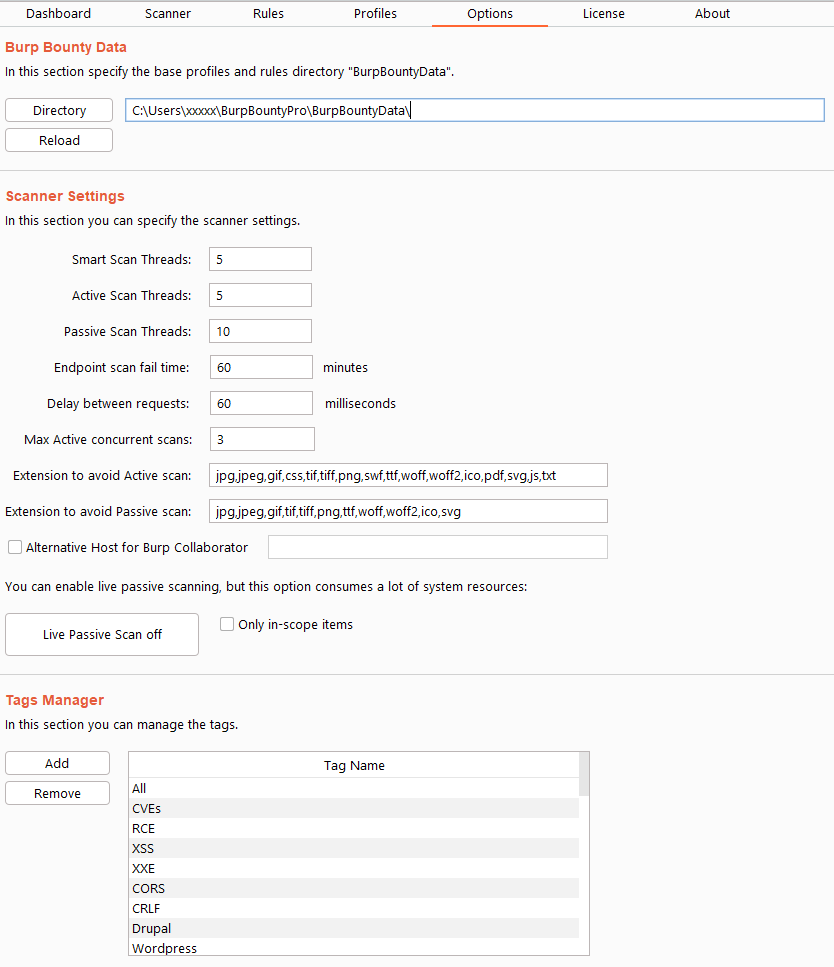
Directory: Here you can select de Burp Bounty Data folder (profiles and rules).
Scanner Settings:
- Smart scan threads: Here the threads that will be used in the active part of the smart scan are specified.
- Active scan threads: Here the threads that will be used in the active scanner are specified.
- Passive scan threads: Here the threads that will be used in the passive scanner are specified.
- Endpoint scan fail time: After the specified scan time has passed, the endpoint will go to the “failed” status and will continue with the next endpoint.
- Delay between requests: Delay between each request.
- Max active concurrent scans: This number specifies how many simultaneous endpoints will be scanned.
- Extensions to avoid in the active scan: Extensions that will not be scanned on the active scanner.
- Extensions to avoid in the passive scan: Extensions that will not be scanned on the passive scanner.
- Alternative host for burp collaborator: You can specify an alternative host to Burp collaborator, which will replace the token {BC}.
- Live passive scan button: Passive scanning can be started in live mode.
- Only in-scope items: The live passive scanner only takes into account the endpoints that are specified in the scope.
Tags Manager:
In this section you can add or delete Tags. If a Tag is deleted, it will be removed from all the profiles where it’s assigned.
License
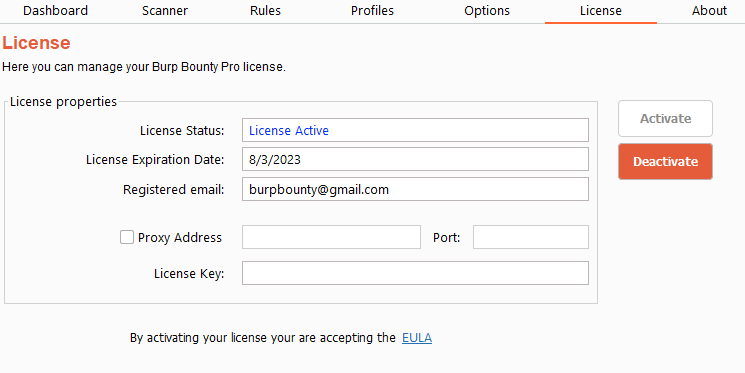
In this section you can view information about Burp Bounty Pro, as well as view the EULA and activate the license.
To activate the license you have to put the license number in the “License key” field and press the “Activate” button.
The “Proxy address” and “Port” field is to specify the IP address and port of the proxy to activate the license through proxy.
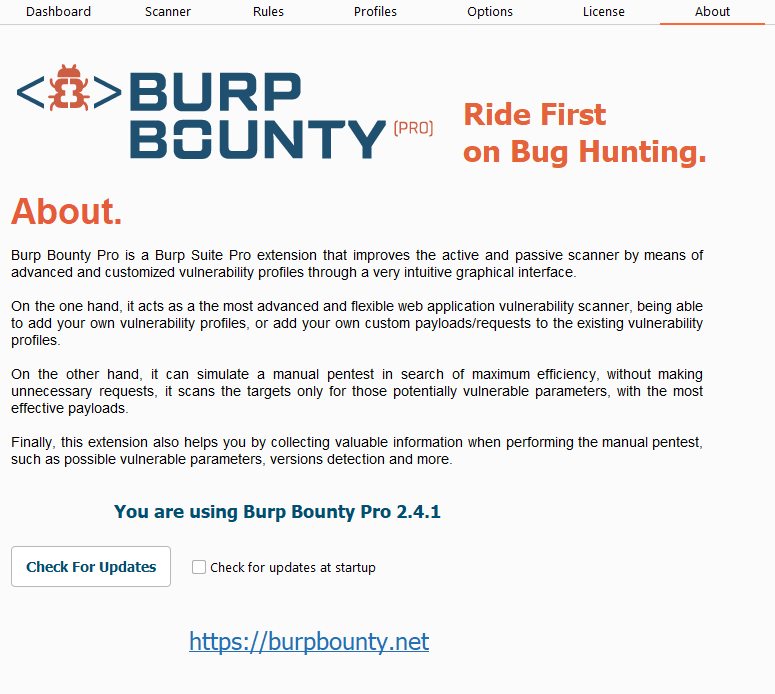
About
In this section you can view information about Burp Bounty Pro and check if new version of the extension or profiles are available.
Extension Usage
Usage
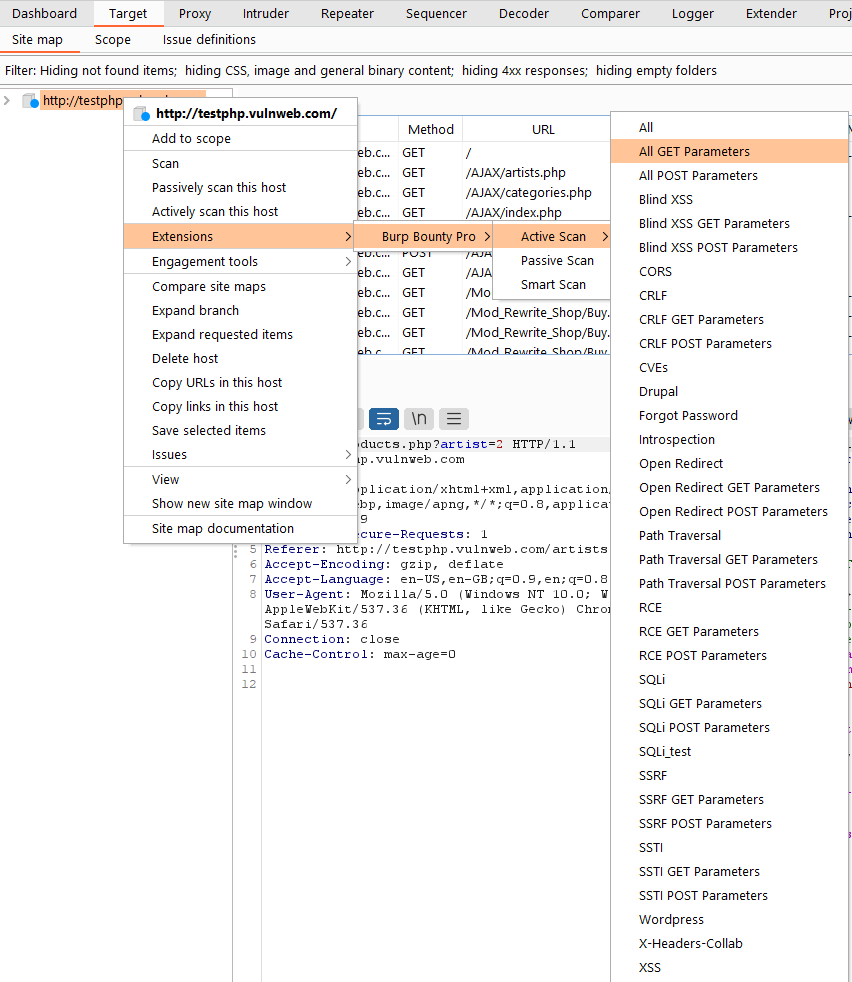
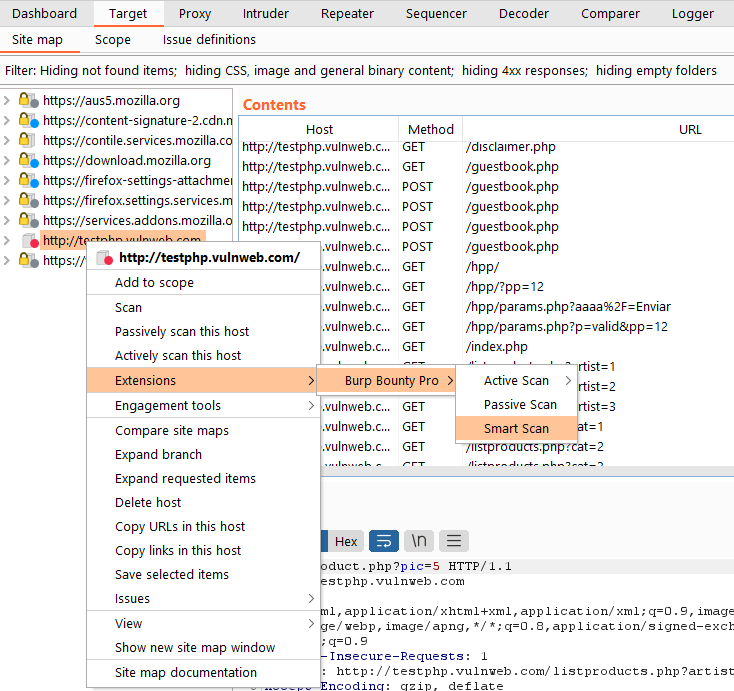
With Burp Bounty Pro you can scan an entire domain in target:
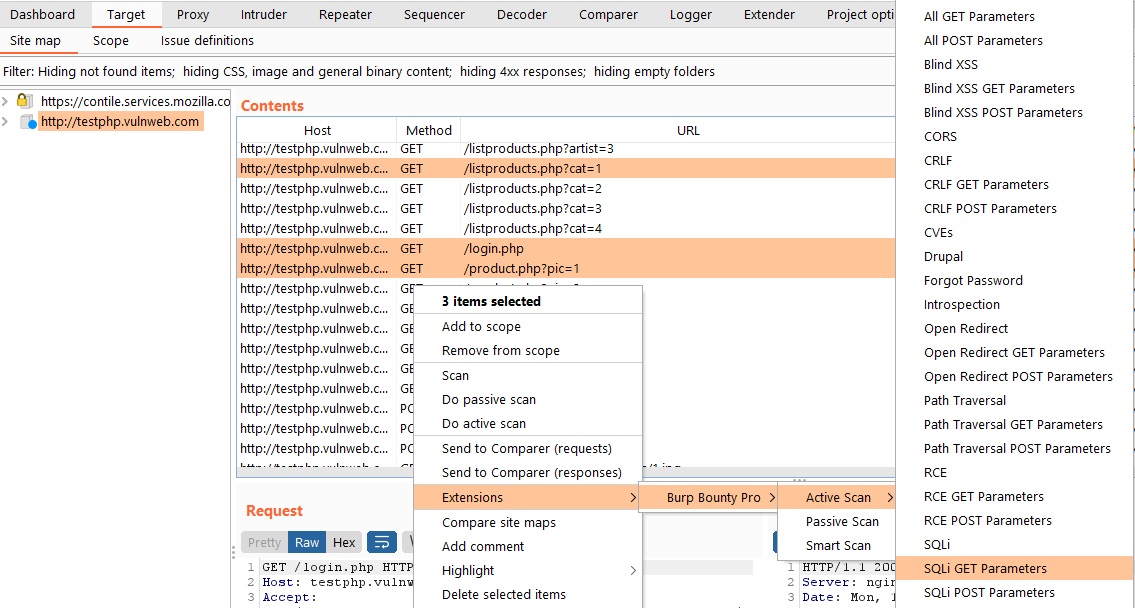
You can also scan several selected requests:
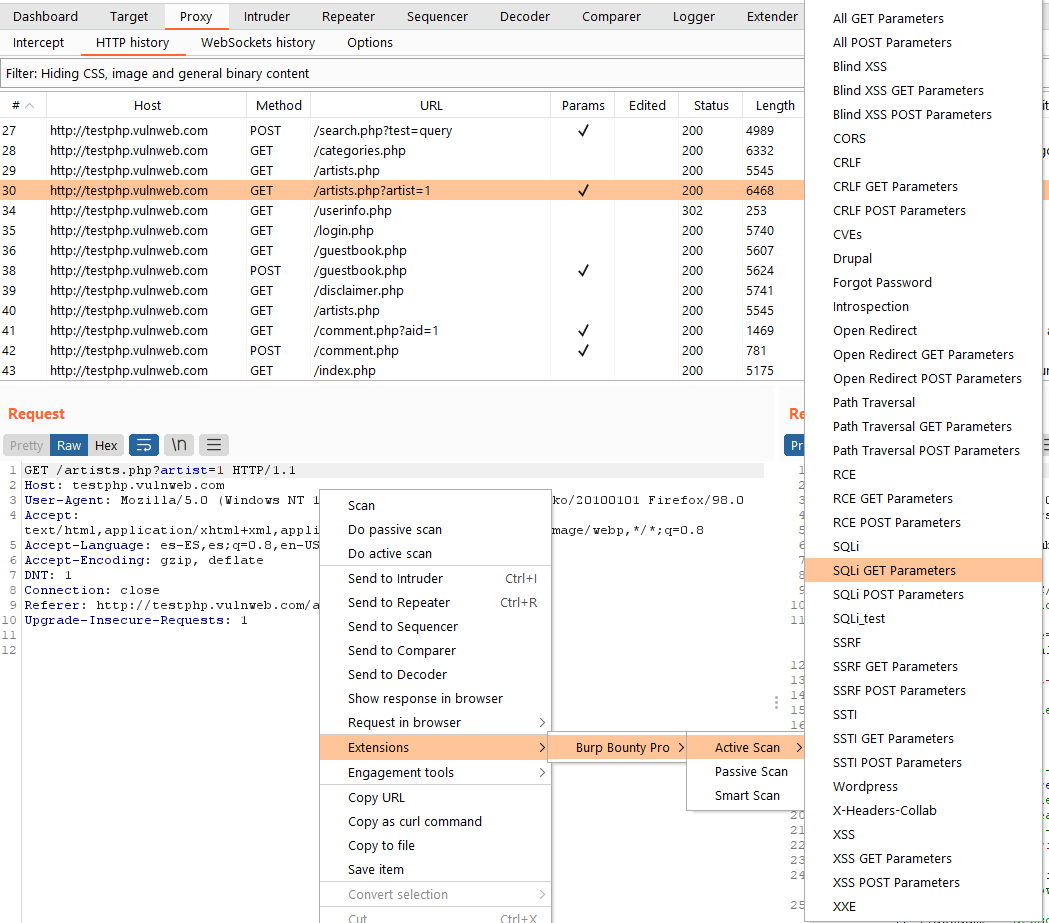
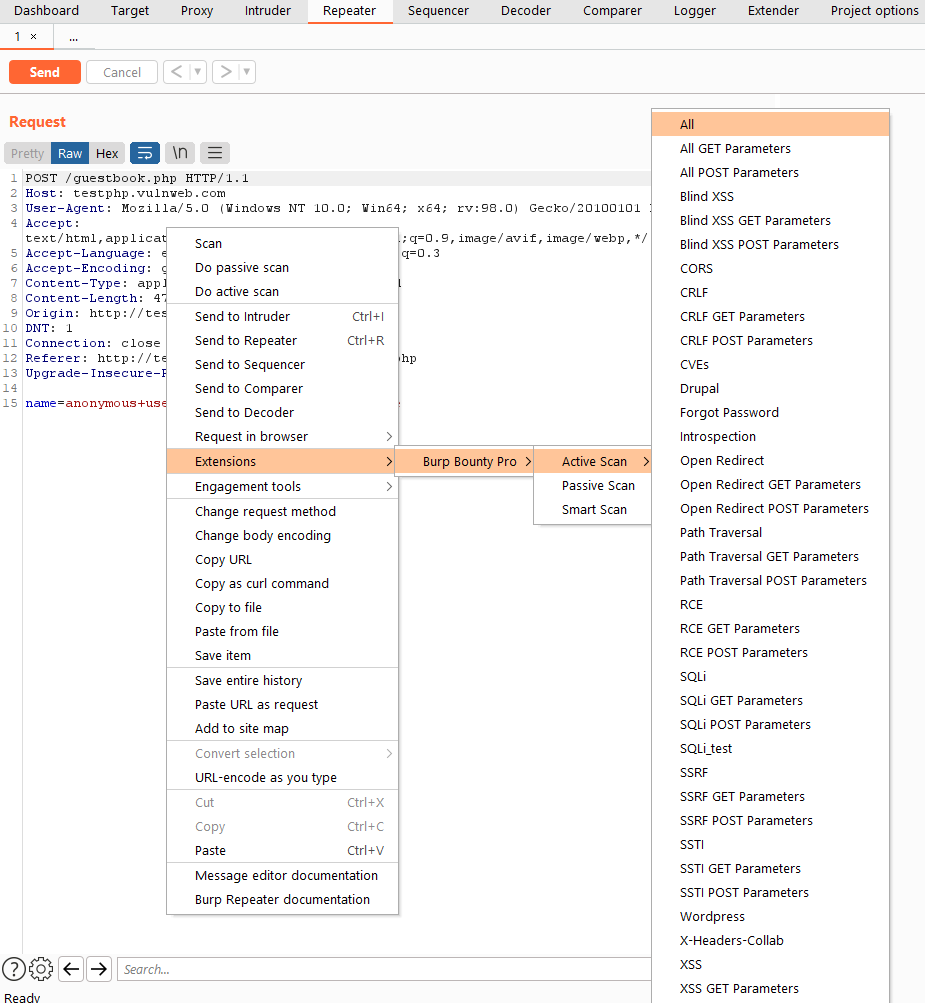
Or a simple request from Target, Repeater, History, etc:
Scan Methods
Active Scan
Burp Bounty Pro gives you the ability to create your own vulnerability profiles to the active scanner.
The philosophy behind Burp Bounty’s active profiles is simple:
- Profile payloads are inserted at the selected insertion points and the request is sent it to the server. Another option is use Raw request and sent it to the server.
- In the HTTP response looks for a pattern (or patterns) with all the filtering options in the profiles.
Operation:
- The request insertion points are extracted.
- All active profiles are executed.
- If there is a vulnerability, it’s reported.
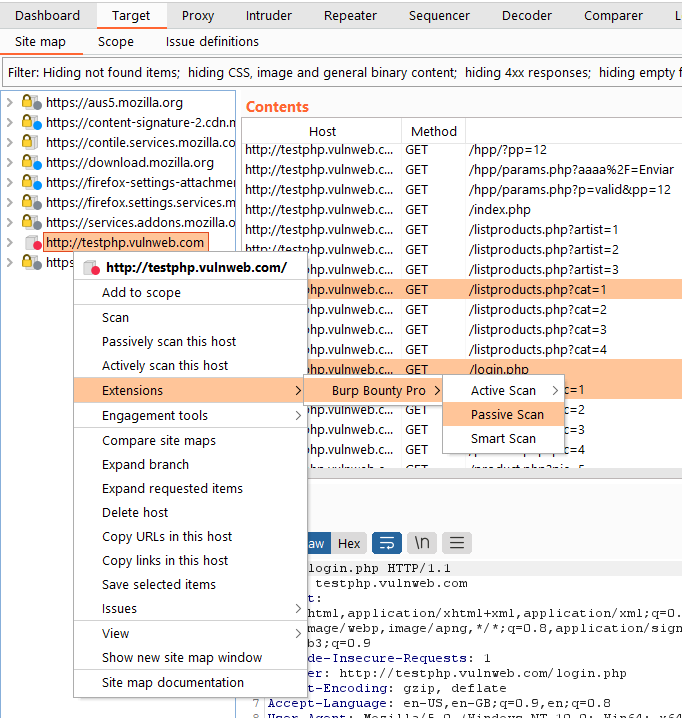
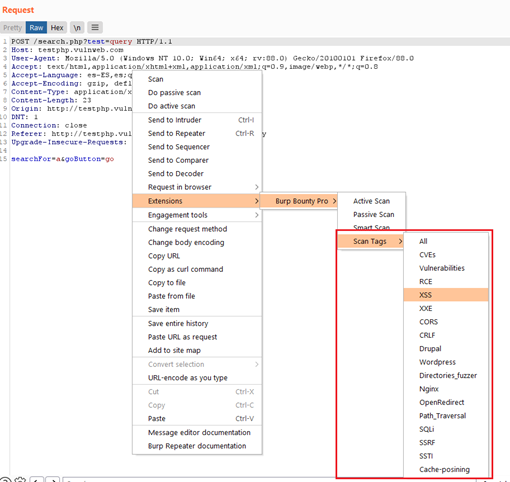
If you scan one or multiple requests with the Active scan, you will launch against the request all the profiles that are active in the tab “Profiles-> Active Profiles”. If you scan a request, several request or one entire domain with “Active Scan->Some TAG”, the profiles that are tagged with “Some TAG” will be launched on that request/requests. For example, if you scan with Active Scan->XSS, the profiles tagged with the XSS tag will be launched on the request/requests.
Right click and “Active Scan->XSS”
The profiles with the Tag “XSS” will be launched. For example, the “Test XSS append” and “XSS” profiles.
You can create new tags and create your own profiles groups for be launched to a target.
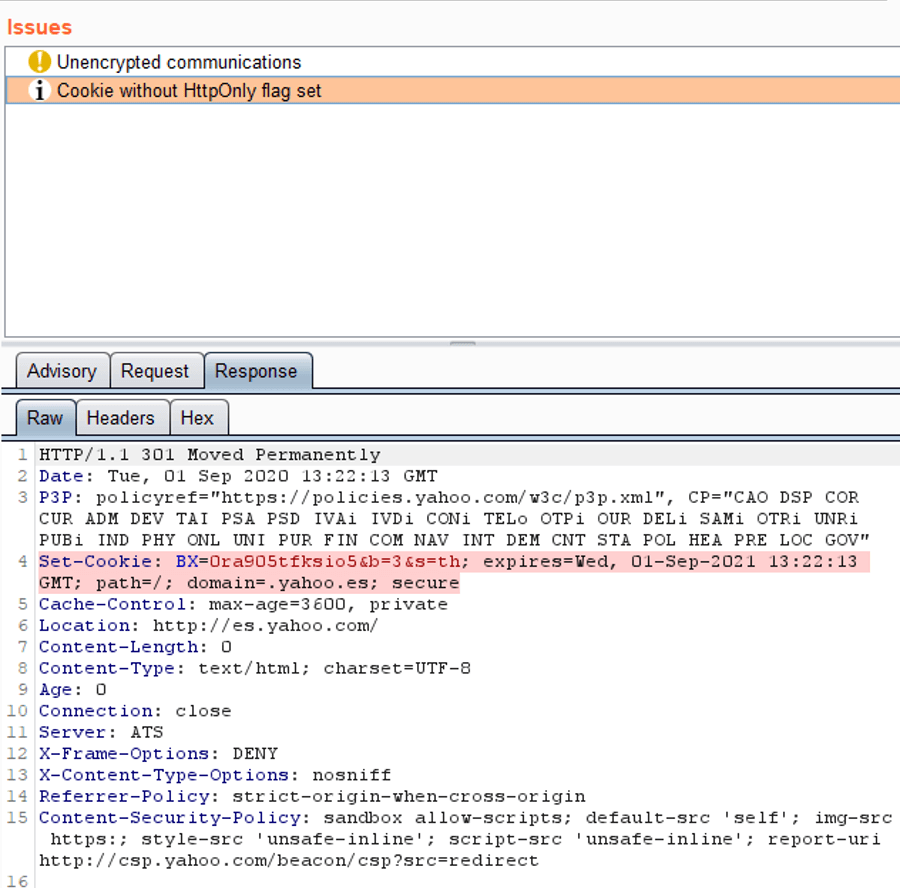
Passive Scan
The passive scanner doesn’t interact with HTTP traffic. Searches for patterns (or absence of them) in HTTP requests and responses.
A pattern is information detected through strings or a regular expression. If it detects a pattern, you get an alert.
If you scan one or multiple requests with the Passive scan, you will launch against the request/response the profiles that are active in the tab “Profiles-> Passive Request Profiles” and “Profiles-> Passive Response Profiles”. This scanner does not perform any request against the target, it only analyses the request/responses passively.
In this image you can see how an alert has been generated for the absence of a pattern. In this case, a Set cookie is detected, without HTTP only attribute set.
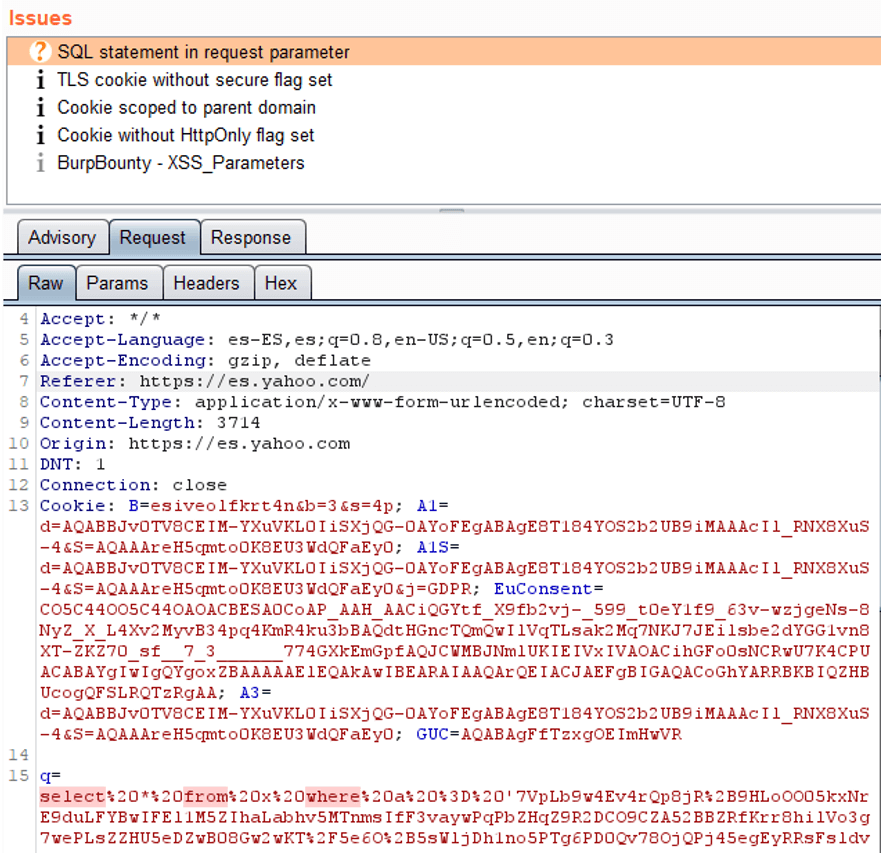
In next image, you can see how it detects an SQL statement in The HTTP Request. As you can see below, a “select” is detected followed by a “from” followed by “where”.
Smart Scan
If you scan a request or a domain with Smart Scan, attacks will be launched based on the enabled rules in the “Rules” section
The Smart Scan is a scanner that uses Burp Bounty Pro profiles to perform automatic attacks simulating the attacks that you would perform manually in a web application.
That is, if it detects an open redirect parameter, for example redirect_url, it will launch open redirect attacks only for that parameter.
You can create a rule to launch the automatic WordPress attacks, only when it has detected that the application you are analysing is a WordPress.
The logic is simple:
- You create a passive profile or several
- You create an active profile or several
- You create a rule, where you specify:
- If you detect that Passive Profiles have generated an alert
- Launches Active Profiles against the host that generated the alerts
- If successful, it will generate an automatic alert
Create a rule:
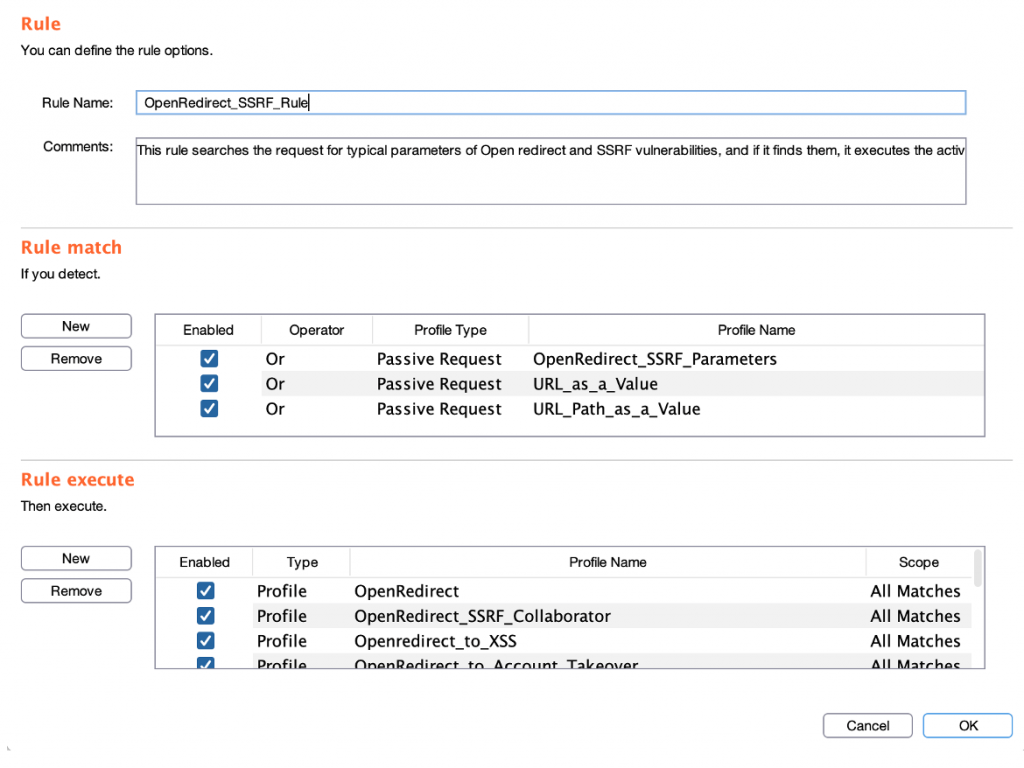
Rules section:
Live Passive Scan
If you want to activate the live passive scanner by default, you can do it through the “Options” tab with “Live Passive Scan” button.
Rules
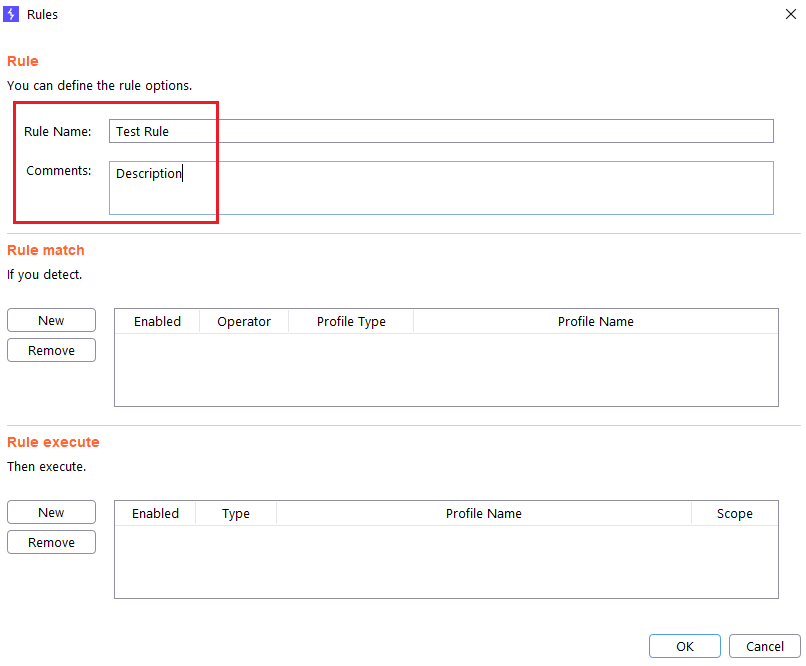
Step 1 (Required): The name of the rule is specified. The Comments field is optional.
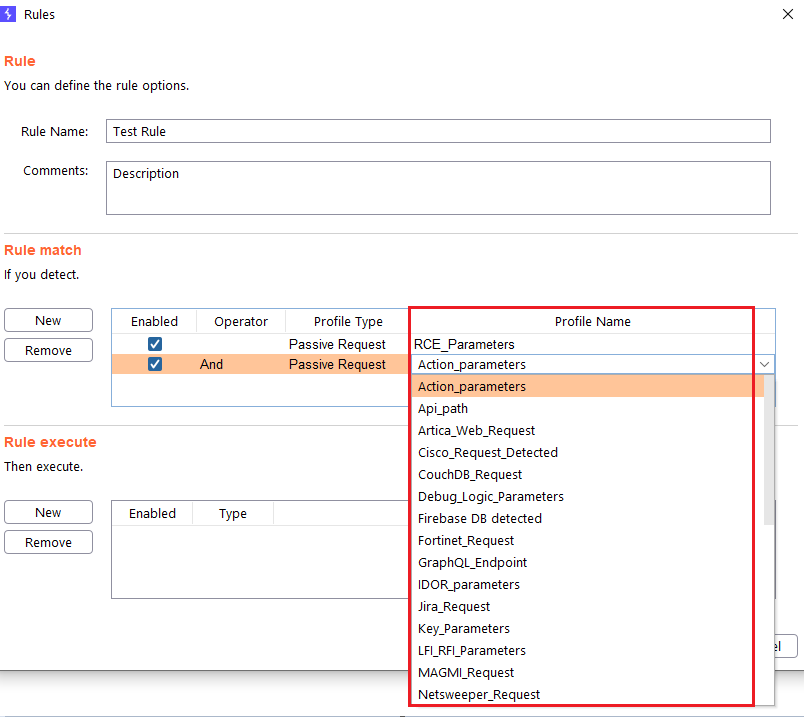
Step 2 (Required): You specify the passive profile(s) you want to be detected before launching the attacks.
- Enabled: Here you can enable or disable the profile in the rule.
- Operator: You can choose between “And” or “Or” logical operator.
- Profile type: You can choose between “Passive Request” and “Passive Response” profiles type.
- Profile Name: You can choose the passive profile that you want to be detected before launching the attacks.
Step 5 (Required): You specify the active profile(s) that you want to be launched against the domain that has generated the passive alerts.
In “Type” column you can choose whether you want a profile to be launched or all the profiles that contain a Tag.
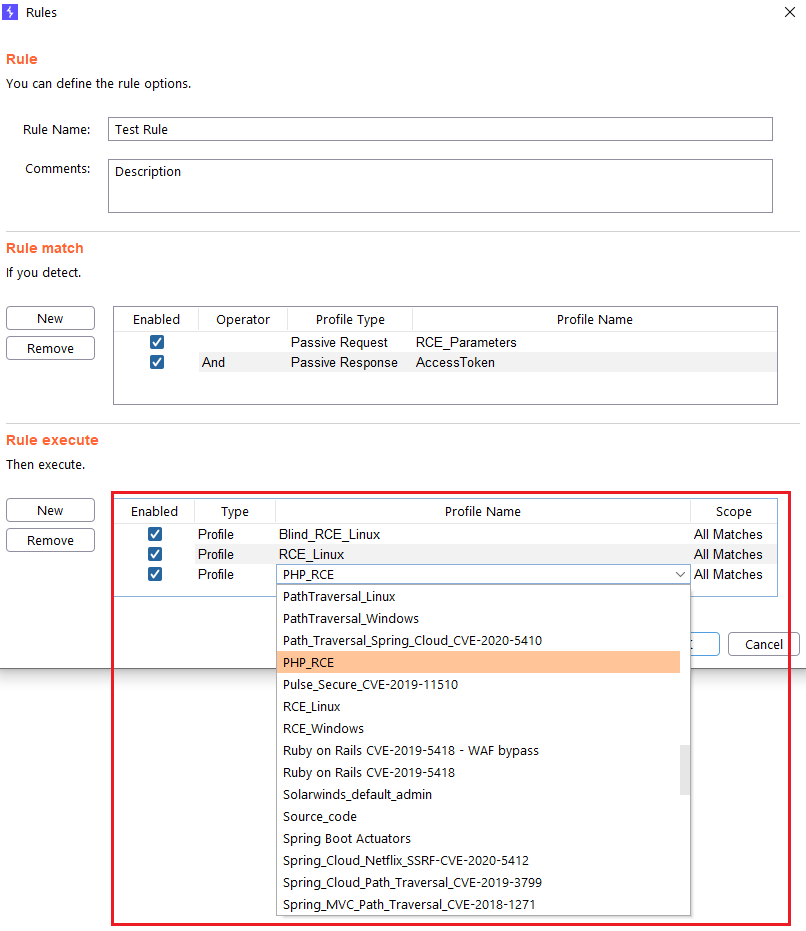
At the “Scope” columns you can specify if you want that the profile to be launched in all the detections, or only once per domain.
Profiles
Active Profiles
Burp Bounty Pro gives you the ability to create your own vulnerability profiles to the active scanner.
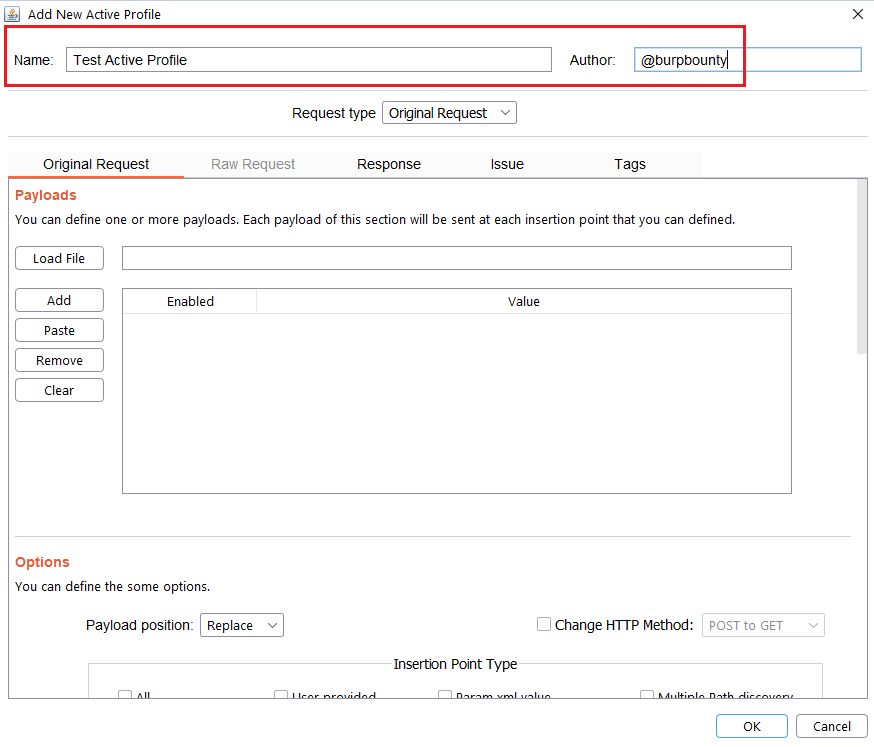
Step 1 (Required): The name and author of the profile are first set.
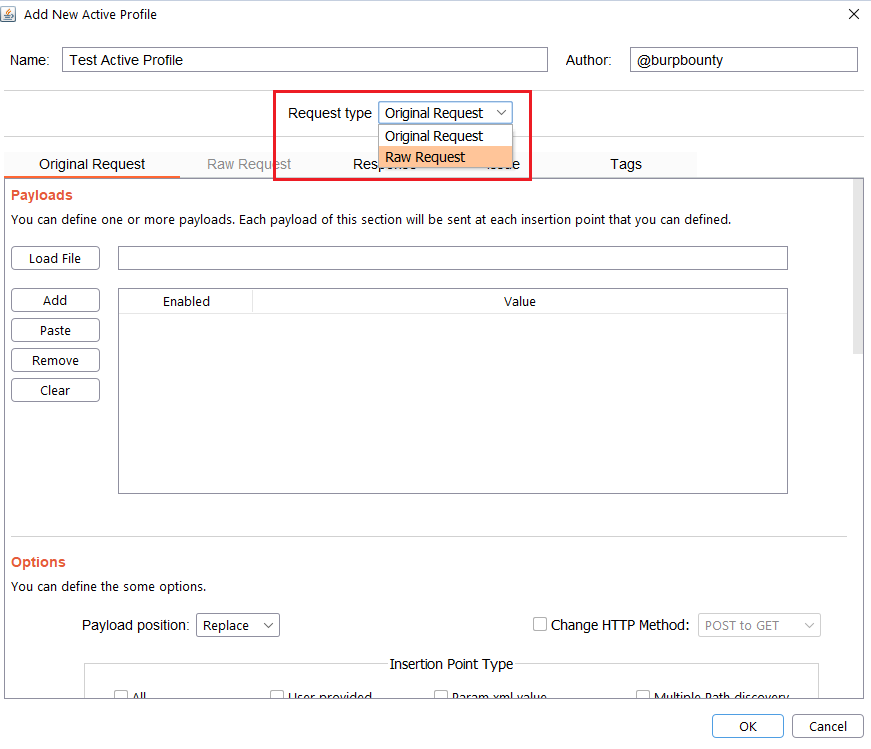
Step 2 (Required): Here you can choose the request type:
- Original Request: The extension get the original request that is sended to the scanner, extract insertion points, put the payloads in the selected insertion points, makes the necessary modifications and sends it to the server.
- Raw Request: You specify a new request, inheriting fields from the original request.
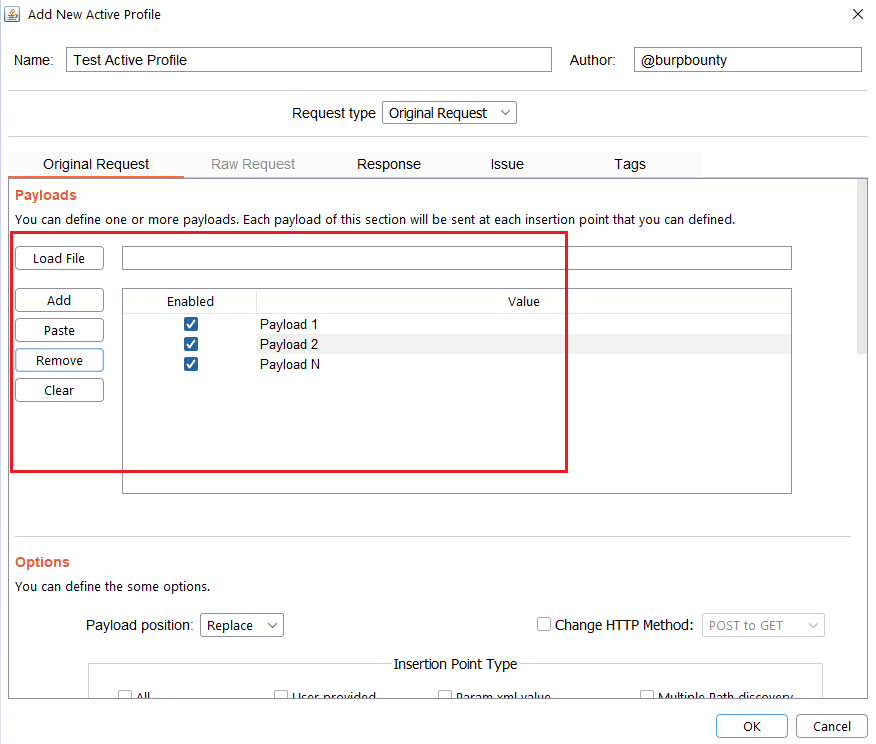
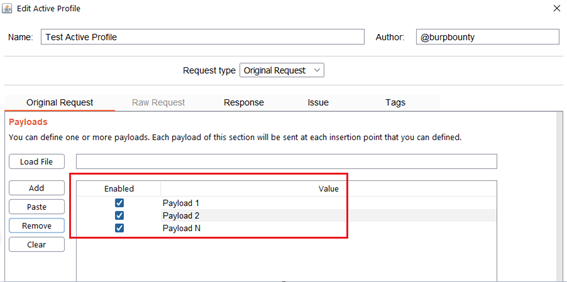
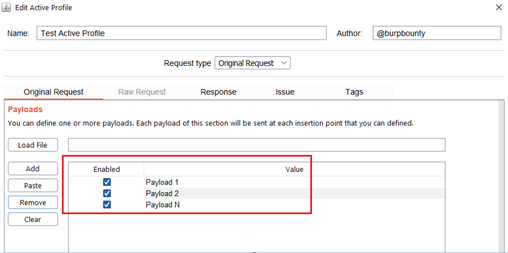
Step 2.1 (Required)- Original Request -> Payloads: It sets the payload or payloads that will be sent in the selected request insertion points.
- You can add the Payload by click on the “add” button and modifying the value, or by pasting it directly with the “Paste” button if you already have it in the clipboard.
- You can also load a payloads file (one per line) with the “Load file” button.
Step 2.2 (Required)- Original Request -> Payload Position:
The Payload position field is to specify where each of the payloads defined in the profiles will be established. For example in a request:
GET /listproducts.php?cat=123456 HTTP/1.1
Host: testphp.vulnweb.com
Suppose that we have specified the Insertion point type is Param url value (123456). If we have the ‘-alert(1)-‘ as a payload, the Payload position can be the following:
Replace: the original value is replaced.
GET /listproducts.php?cat=‘-alert(1)-‘ HTTP/1.1
Host: testphp.vulnweb.com
Append: The value of the payload is added to the original value.
GET /listproducts.php?cat=123456‘-alert(1)-‘ HTTP/1.1
Host: testphp.vulnweb.com
Insert: The value of the payload is inserted in the middle of the original value.
GET /listproducts.php?cat=123‘-alert(1)-‘456 HTTP/1.1
Host: testphp.vulnweb.com
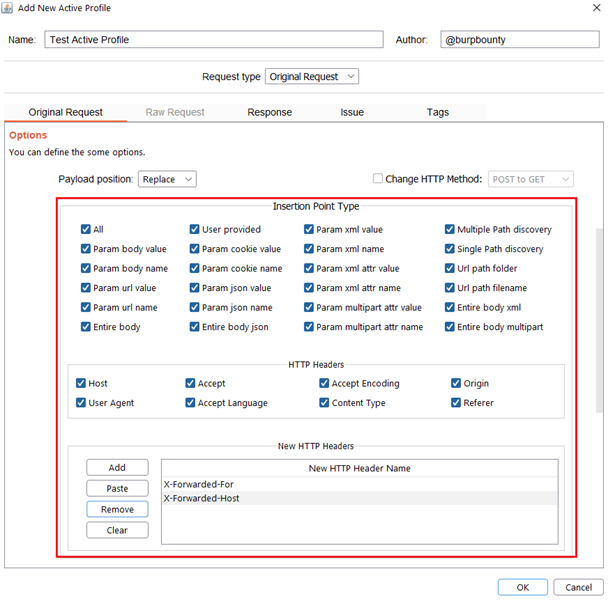
Step 2.4 (Required)- Original Request -> Insertion Point Type:
Here you can select the insertion points where you want the payloads to be sent.
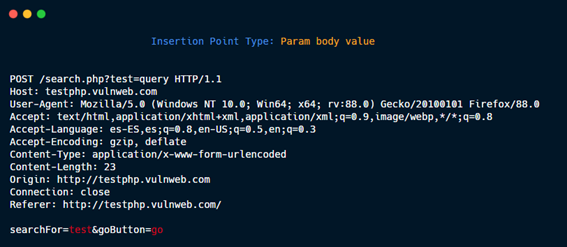
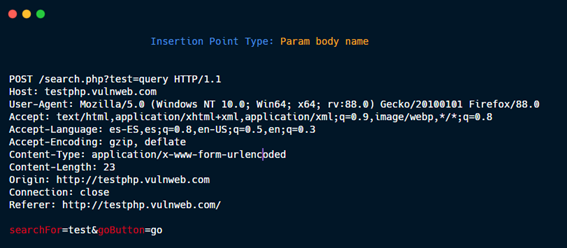
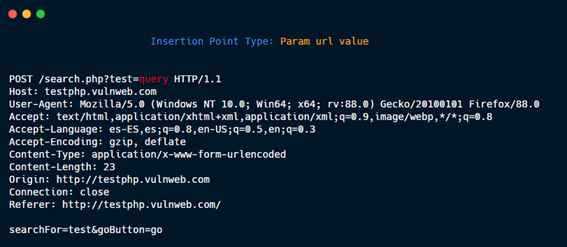
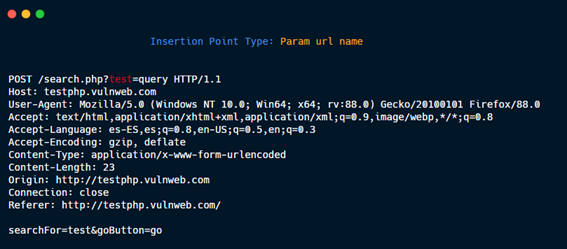
The insertion points are the zones of the HTTP request where the specified payload will be placed. For example in this HTTP request:
POST /search.php?test=query HTTP/1.1
Host: testphp.vulnweb.com
User-Agent: Mozilla/5.0 (Windows NT 10.0; Win64; x64; rv:88.0) Gecko/20100101 Firefox/88.0
Accept: text/html,application/xhtml+xml,application/xml;q=0.9,image/webp,*/*;q=0.8
Accept-Language: es-ES,es;q=0.8,en-US;q=0.5,en;q=0.3
Accept-Encoding: gzip, deflate
Content-Type: application/x-www-form-urlencoded
Content-Length: 26
Connection: close

searchFor=test&goButton=go
If the payload <script>alert (1)</script> is specified and the insertion point “Param body value” is selected, the HTTP requests that Burp Bounty Pro will make will be:
- Change “test” value for the payload:
POST /search.php?test=query HTTP/1.1
Host: testphp.vulnweb.com
User-Agent: Mozilla/5.0 (Windows NT 10.0; Win64; x64; rv:88.0) Gecko/20100101 Firefox/88.0
Accept: text/html,application/xhtml+xml,application/xml;q=0.9,image/webp,*/*;q=0.8
Accept-Language: es-ES,es;q=0.8,en-US;q=0.5,en;q=0.3
Accept-Encoding: gzip, deflate
Content-Type: application/x-www-form-urlencoded
Content-Length: 26
Connection: close

searchFor=<script>alert (1)</script>&goButton=go
- Change “go” value, for the payload:
POST /search.php?test=query HTTP/1.1
Host: testphp.vulnweb.com
User-Agent: Mozilla/5.0 (Windows NT 10.0; Win64; x64; rv:88.0) Gecko/20100101 Firefox/88.0
Accept: text/html,application/xhtml+xml,application/xml;q=0.9,image/webp,*/*;q=0.8
Accept-Language: es-ES,es;q=0.8,en-US;q=0.5,en;q=0.3
Accept-Encoding: gzip, deflate
Content-Type: application/x-www-form-urlencoded
Content-Length: 26
Connection: close

searchFor=test&goButton=<script>alert (1)</script>
Below you can see in detail each insertion point type.
Param body value.
Param body name.
Param URL value.
Param URL name.
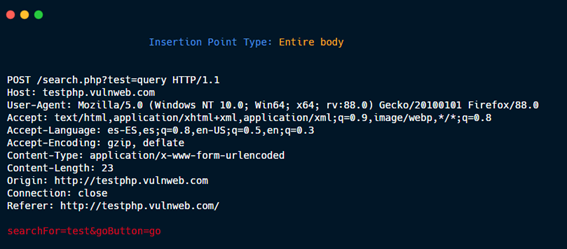
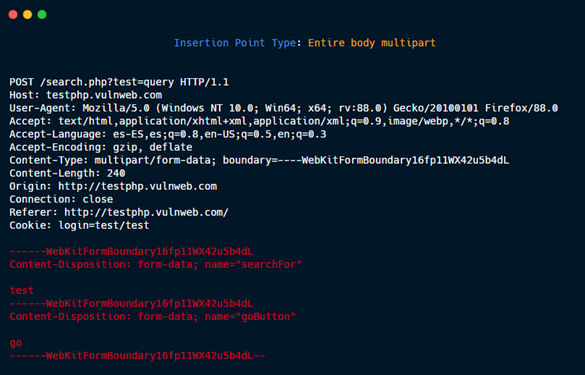
Entire body.
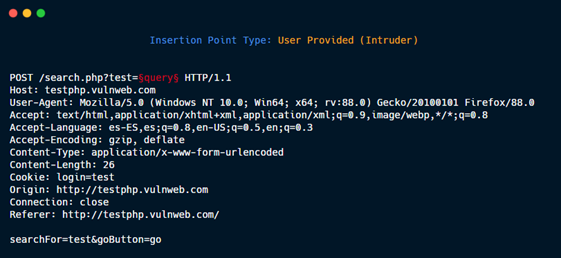
User provided: Defined by the user in the Intruder tab.
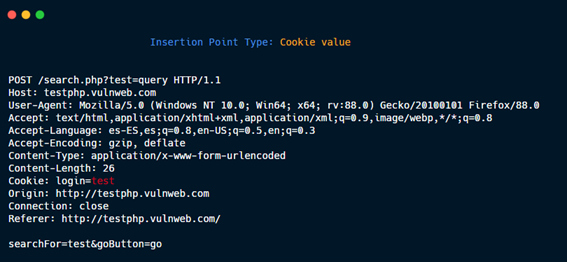
Cookie value.
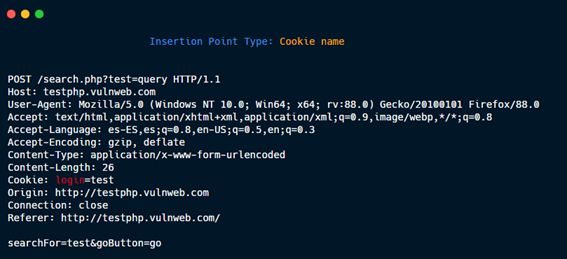
Cookie name.
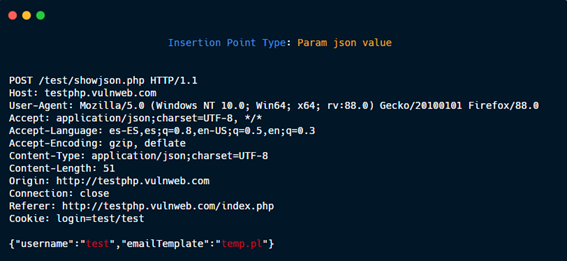
Param json value.
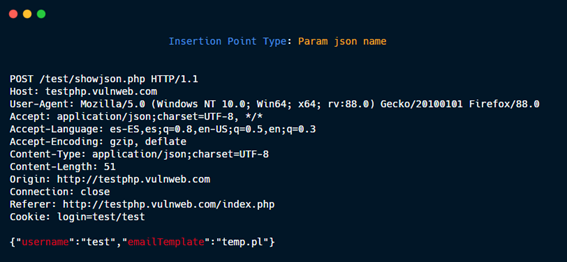
Param json name.
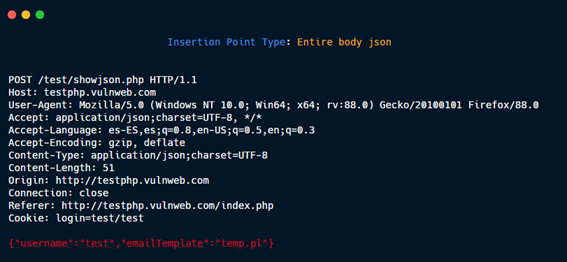
Entire body json.
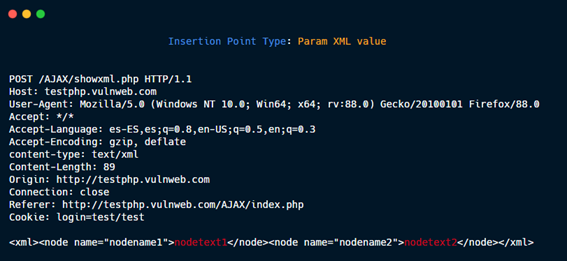
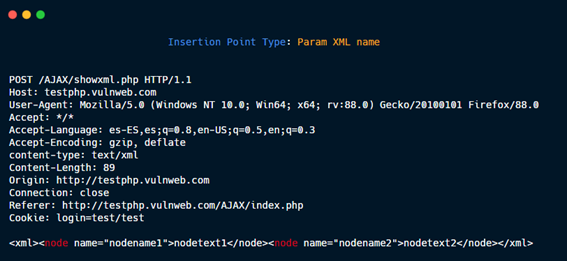
Param XML value.
Param XML name.
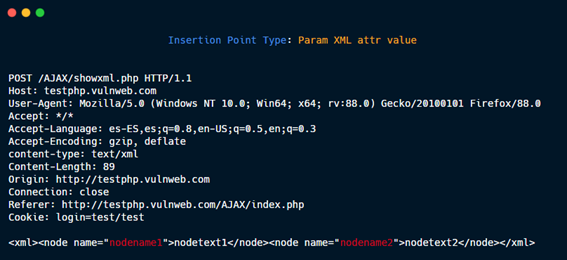
Param XML attr value.
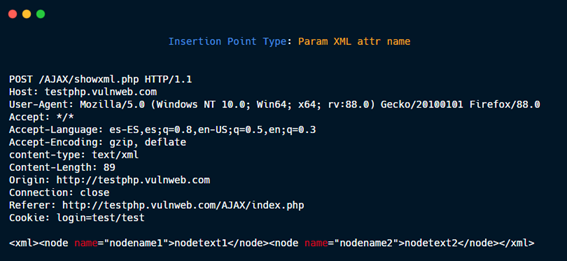
Param XML attr name.
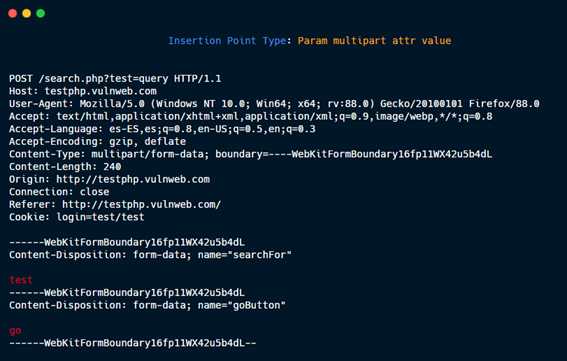
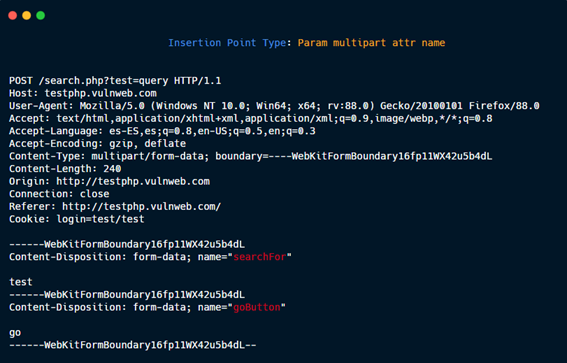
Param multipart attr value.
Param multipart attr name.
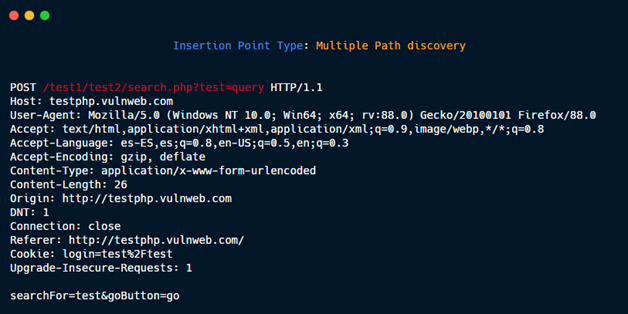
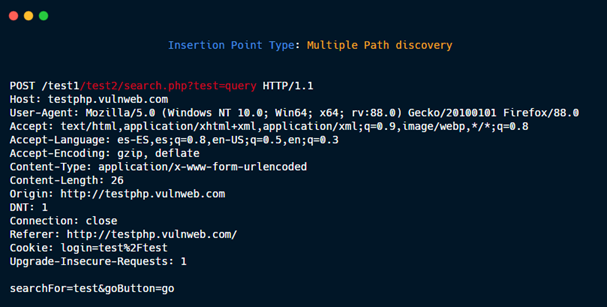
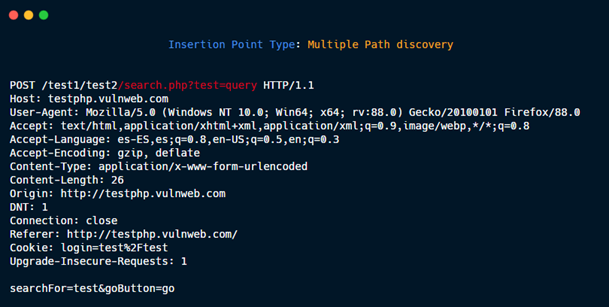
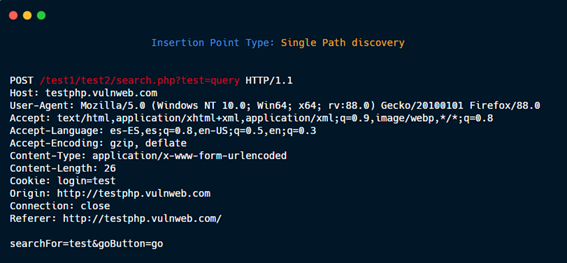
Multiple Path discovery: These insertions point type are added to the requests to discover hidden files and directories:
GET /dir1/dir2/file.php?param=value HTTP/1.1
Generate three new Insertion points:
1- GET {HERE} HTTP/1.1
2- GET /dir1{HERE} HTTP/1.1
3- GET /dir1/dir2{HERE} HTTP/1.1
Then, if you put in payload /.git/HEAD, the three new request are:
1- GET /.git/HEAD HTTP/1.1
2- GET /dir1/.git/HEAD HTTP/1.1
3- GET /dir1/dir2/.git/HEAD HTTP/1.1
without param=value.
Multiple Path discovery 1.
Multiple Path discovery 2.
Multiple Path discovery 3.
Single Path discovery.
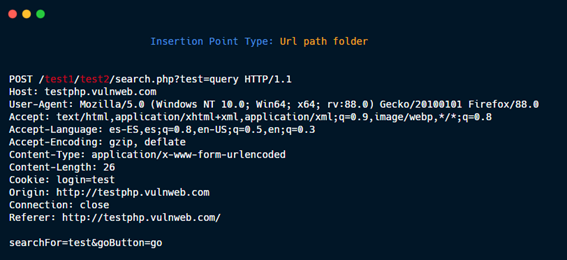
Url path folder.
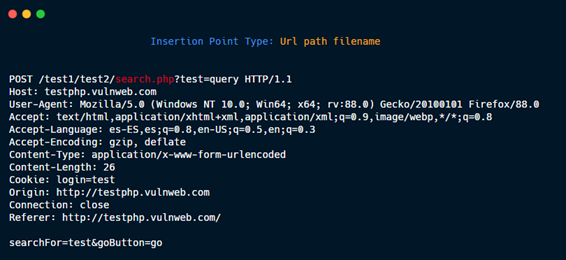
Url path filename.
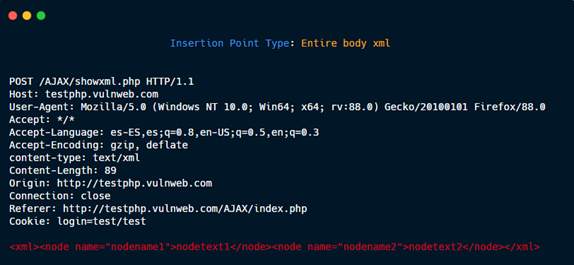
Entire body xml.
Entire body multipart.
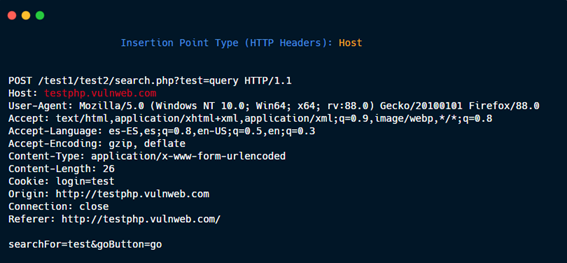
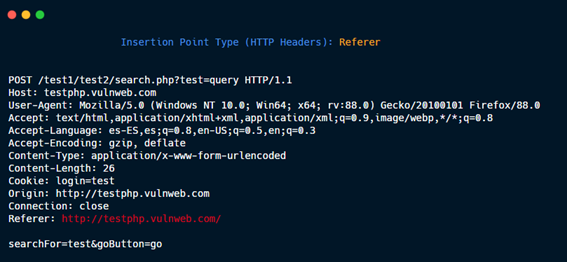
HTTP Headers: Host
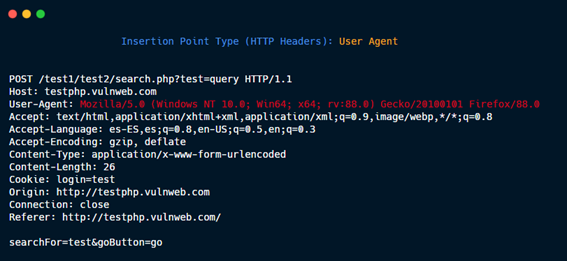
HTTP Headers: User agent
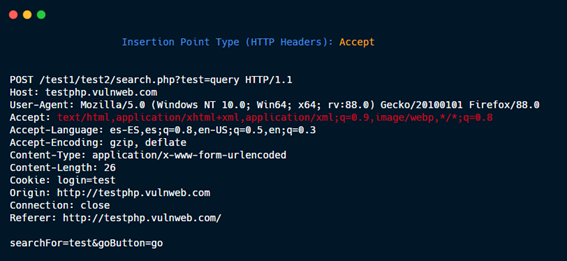
HTTP Headers: Accept
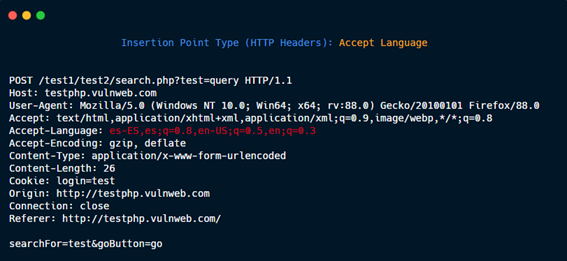
HTTP Headers: Accept Language
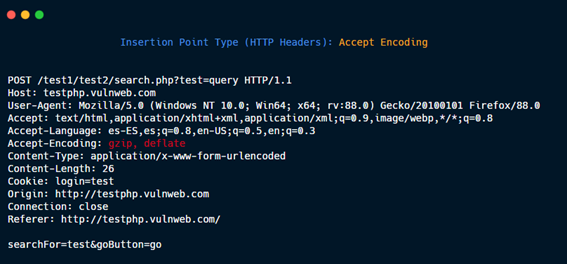
HTTP Headers: Accept Encoding
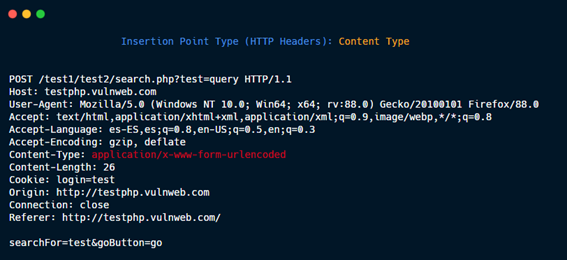
HTTP Headers: Content Type
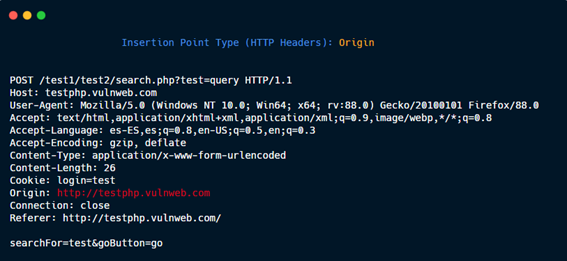
HTTP Headers: Origin
HTTP Headers: Referer
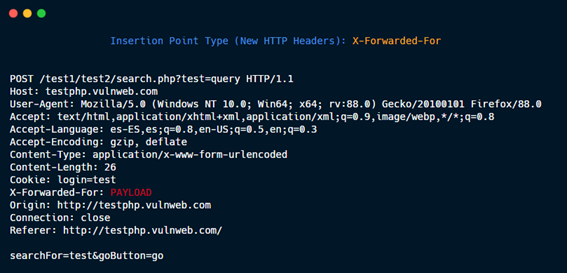
New HTTP Headers: X-Forwarded-For (or whichever that you specify)
Step 2.5 (Optional)- Original Request -> Match and Replace:
In this section you can replace values in the payload/request or you can insert new fields in the HTTP request.

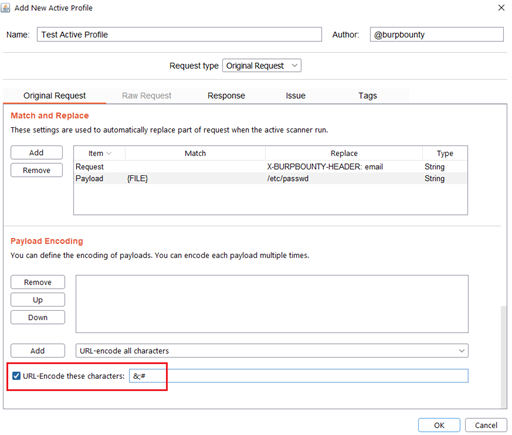
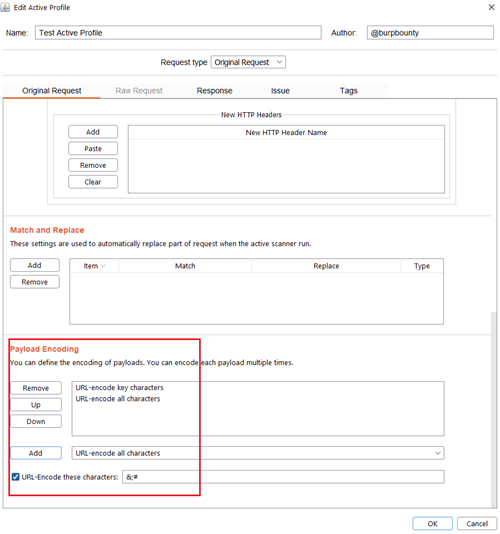
Step 2.6 (Optional)- Original Request -> Payload encoding:
In this section you can use one or more encodings that will be applied to the payloads before being sent in the HTTP request. You can choose between:
- URL-encode key characters
- URL-encode all characters
- URL-encode all characters (Unicode)
- HTML-encode key characters
- HTML-encode all characters
- Base64-encode
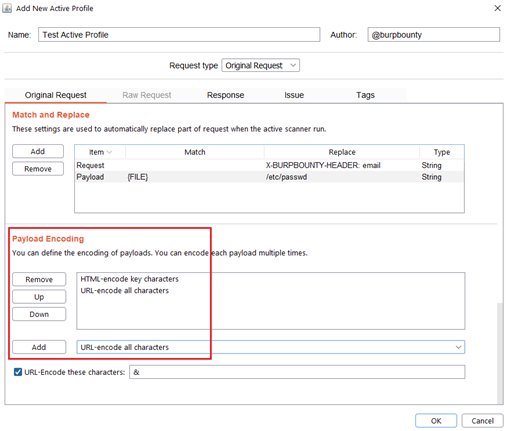
In this section, you can also encode in “URL encode” only the payload characters that you choose:
Step 3 (Required if you choose raw request option)- Raw Request:
Another new improvement of Burp Bounty Pro 2 is the possibility of sending Raw requests inheriting attributes of the request that is being scanned.
This means that when a HTTP request or domain is scanned, this custom RAW Request will be sent to the system that you are attacking.
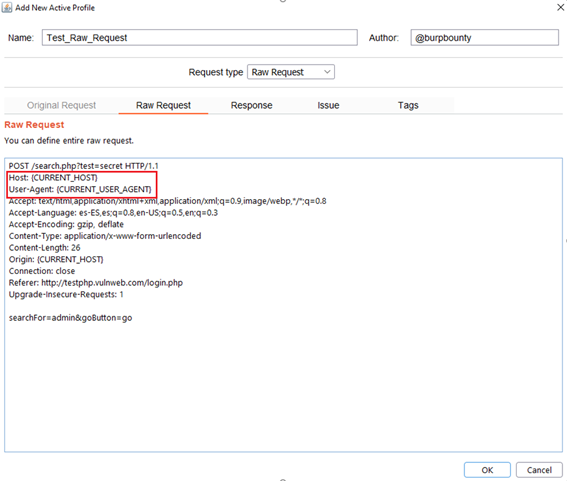
You can insert these attributes wherever you want in the Raw Request. The available attributes are:
{CURRENT_URL}
{CURRENT_PORT}
{CURRENT_PATH}
{CURRENT_HOST}
{CURRENT_METHOD}
{CURRENT_QUERY}
{CURRENT_FILE}
{CURRENT_PROTOCOL}
{CURRENT_USER_AGENT}
{CURRENT_REFERER}
{CURRENT_ORIGIN}
{CURRENT_CONTENT_TYPE}
{CURRENT_ACCEPT}
{CURRENT_ACCEPT_LANGUAGE}
{CURRENT_ACCEPT_ENCODING}
{CURRENT_CONTENT_LENGTH}
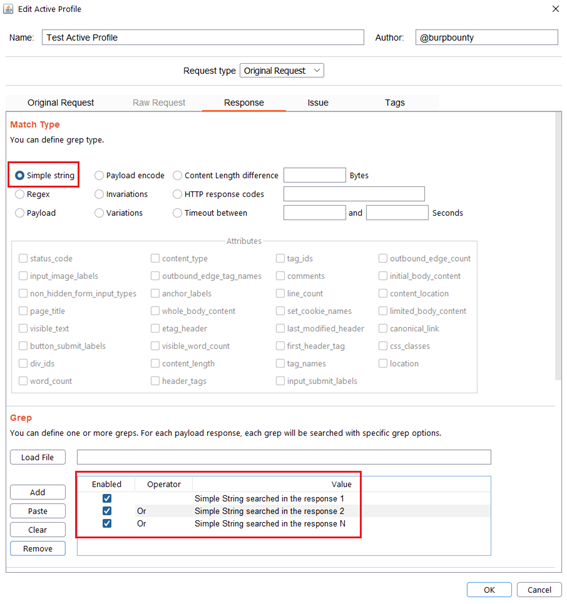
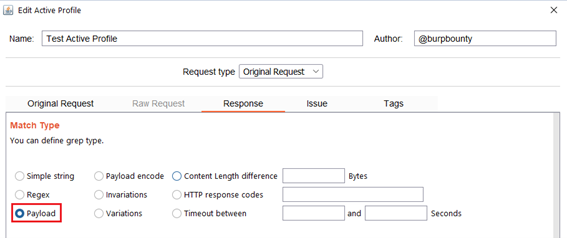
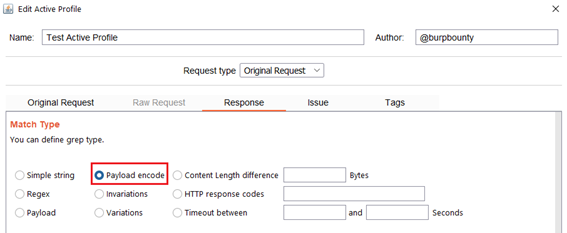
Step 4 (Required)- Response->Match Type: In this section we must specify how we will look for the pattern in the HTTP response.
- Simple string: Search for a simple string in the HTTP Response that you specify in the “Grep” section.
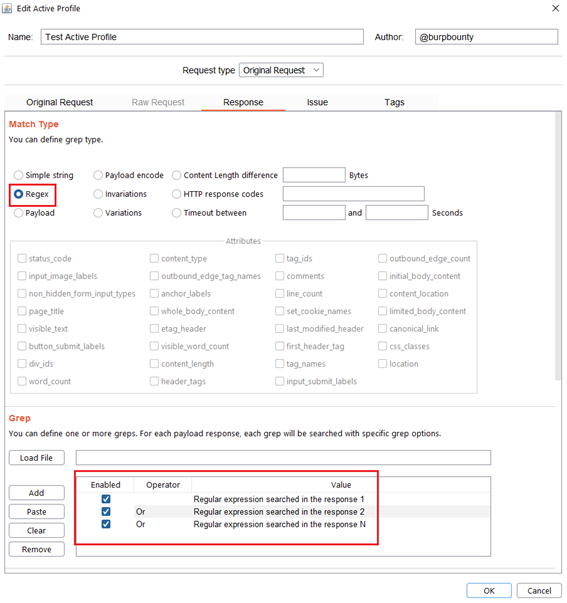
- Regex: Search for a regular expression in the HTTP Response that you specify in the “Grep” section.

- Payload: Search for a Payload (that have been specified in the Original Request->Payloads section) in the HTTP response.
- Payload encode: If you have encoded the payload with the original request functionalities, here you look for the value of the payload before it’s encoded, in the HTTP response. In this case you look for “Payload 1…Payload N” in the HTTP Response.
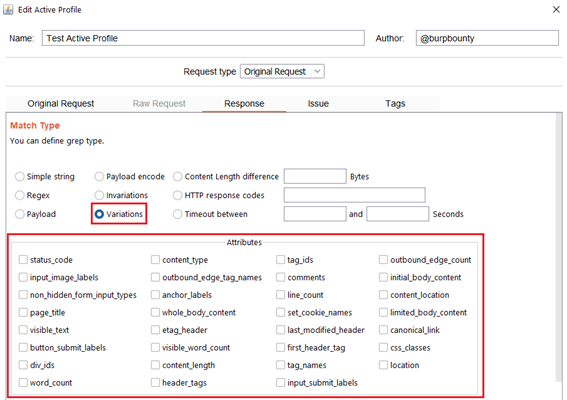
- Invariations: This option looks for the NO difference in the attributes marked in the “Attributes” section between the response of the original HTTP request and the responses of the HTTP requests modified with the payloads.
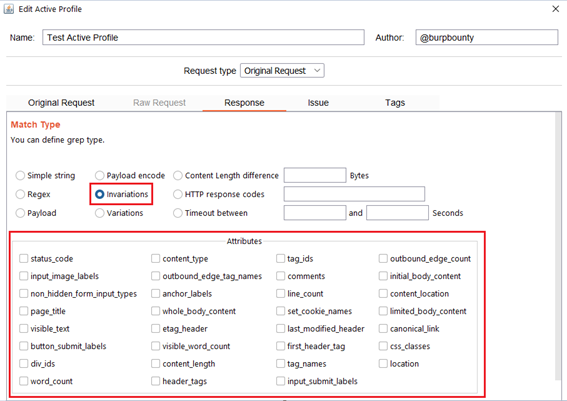
- Variations: This option looks for the difference in the attributes marked in the “Attributes” section between the response of the original HTTP request and the responses of the requests modified with the payloads.
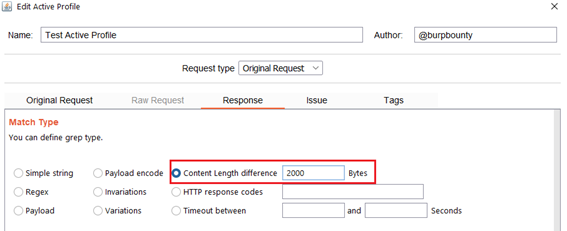
- Content length difference: This option finds the difference between the content length (in bytes) of the response of the original HTTP request and the responses of the requests modified with the payloads.
- HTTP Response codes: This option looks for the HTTP response codes. The following example will search for:
- HTTP 200 OK
- HTTP 403 Forbidden
- HTTP 302 Found

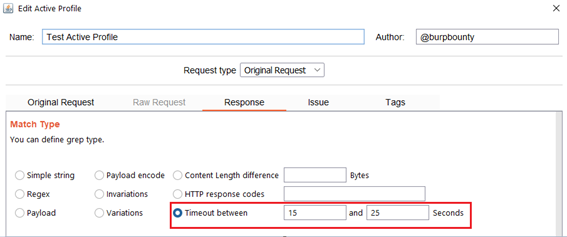
- Timeout between: This option searches in the HTTP responses for a time delay in seconds in a range that can be specified. The following example looks for a HTTP response to take between 15 seconds and 25 seconds to respond.
Step 5 (Required if you choose Simple string or Regex match type)- Response->Grep: In this section we must specify what we will look for in the HTTP response.
Simple String: What “Simple string” we will look for in the response. In this case we will look for three simple strings, “Simple String searched in the response 1”, “Simple String searched in the response 2”, “Simple String searched in the response N”.

Regex: What regular expression we will look for in the response. In this case we will look for three regular expressions, “Regular expression searched in the response 1”, “Regular expression searched in the response 2”, “Regular expression searched in the response N”.
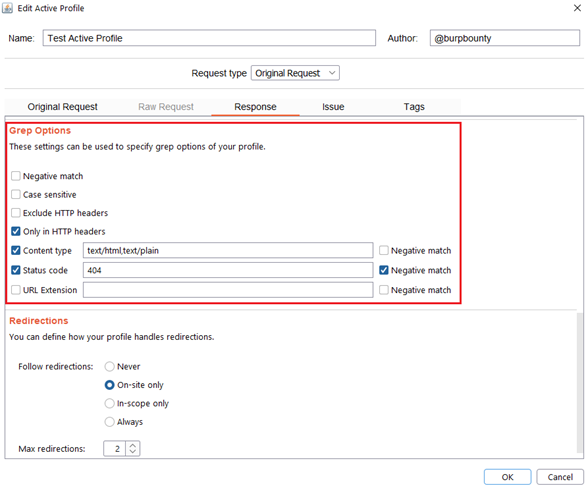
Step 6 (Optional)- Response->Grep Options: In this section you can specify more options to create more accurate profiles and obtain fewer false positives. This options only are disponible for the Match types:
- Simple string
- Regex
- Payload
- Payload Encode
Each of the options will be detailed below:
- Negative match: It will show you the alert, if the pattern you have set is not present in the HTTP response.
- Case sensitive: The pattern will be searched in the HTTP response considering that it’s case sensitive.
- Exclude HTTP headers: The pattern will NOT be searched in the HTTP headers. (Only in the body of the HTTP response)
- Only in HTTP header: The pattern will ONLY be searched in the HTTP headers.
- Content type: The pattern will only be searched in the HTTP response if the content type of the HTTP response is equal to the “content type” field. You can specify multiple content types separated by commas. You can also specify that ONLY look for the pattern in the HTTP response if the content type is NOT equal to this field, marking the “negative match” checkbox.
- Status code: The pattern will only be searched in the HTTP response if the Status code of the HTTP response is equal to the “status code” field. You can specify multiple status code separated by commas. You can also specify that ONLY look for the pattern in the HTTP response if the status code is NOT equal to this field, marking the “negative match” checkbox.
- URL Extension: It will only search for patterns if the extension of the URL to which the request is made, matches the extension or extensions specified in this field (for example, php or jsp, etc) or if it doesn’t match (negative match checkbox)
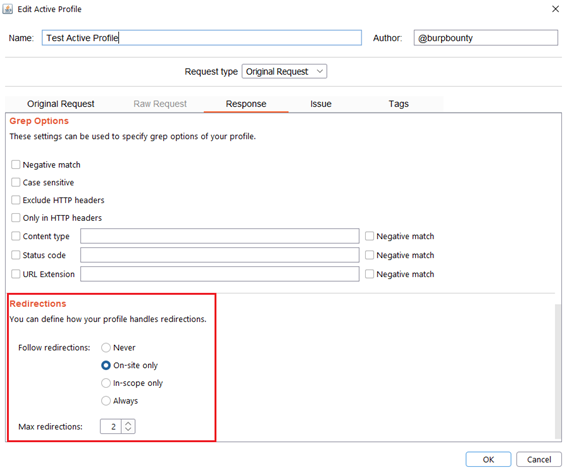
Step 7 (Optional)- Response->Redirections: In this section you can specify the redirection options. This options only are disponible for the Match types:
- Simple string
- Regex
- Payload
- Payload Encode
Each of the options will be detailed below:
- Never: As the name suggests, no redirect will be followed.
- On-site only: It will only follow the redirects that lead to the same site of origin.
- In-scope only: It will only follow redirects that lead to a domain that is in scope.
- Always: As the name suggests, it will follow all redirects.
Max redirections: In this field the maximum number of redirects that will follow is indicated.
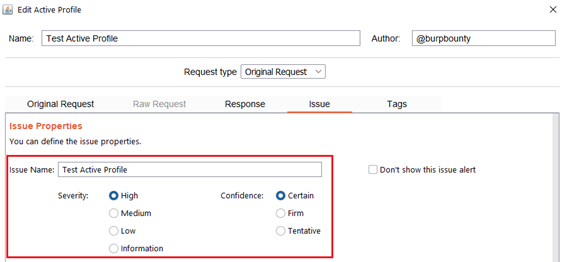
Step 8 (Required)- Issue: It specifies the name that will appear in the alert and the criticality of that alert.
It’s necessary for the issue to appear, give it a “Issue Name” and complete the two fields, both the “severity” and the “confidence”. The issue descriptions are optional.
If you check the option “Don’t show this issue alert” the alert will not be shown in the dashboard, it will only be used for the Smart Scan.
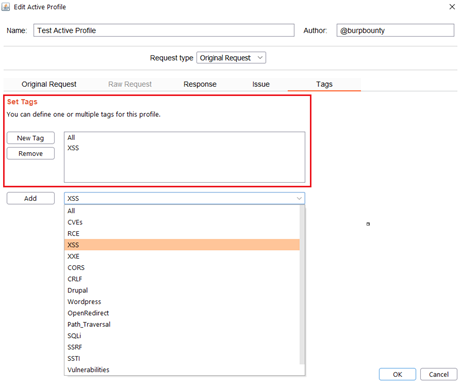
Step 9 (Optional): A tag is created and assigned to the profile. These tags can be used to launch the “Scan Tags” scanner.
Passive Request Profiles
- Passive Request Scanner: Look for strings/regex (or the absence of them) in HTTP requests.
Next let’s see how passive request profiles are created to look for something (or the absence of it) in the HTTP request.
Step 1 (Required): The name and author of the profile are first set.
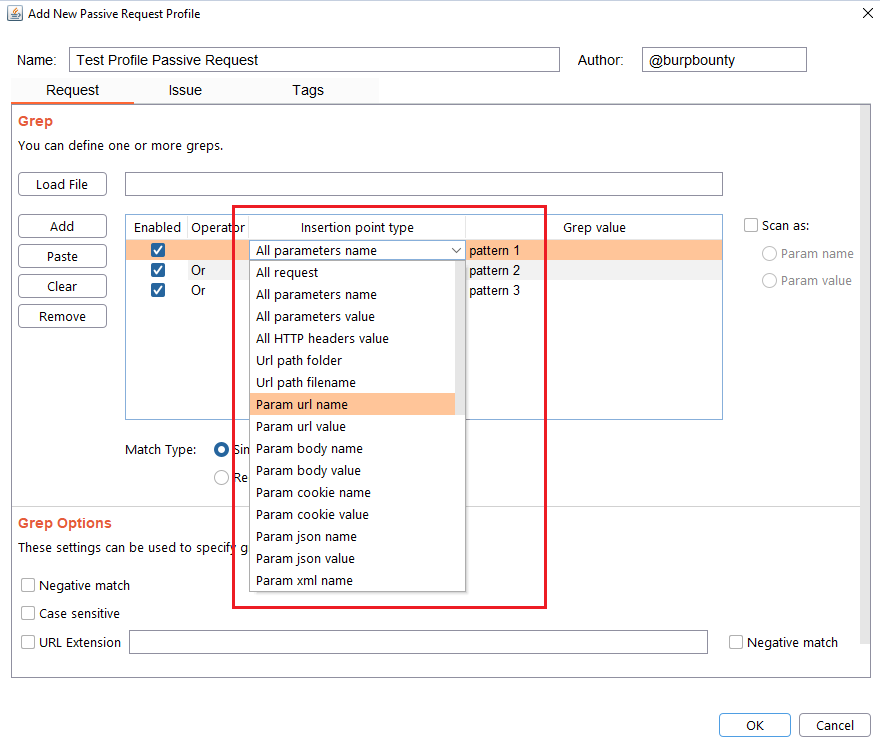
Step 2 (Required): Specifies the pattern or patterns to search in the request.
- You can add the pattern by click on the “add” button and modifying the value, or by pasting it directly with the “Paste” button if you already have it in the clipboard.
- You can also load a patterns file (one per line) with the “Load file” button.
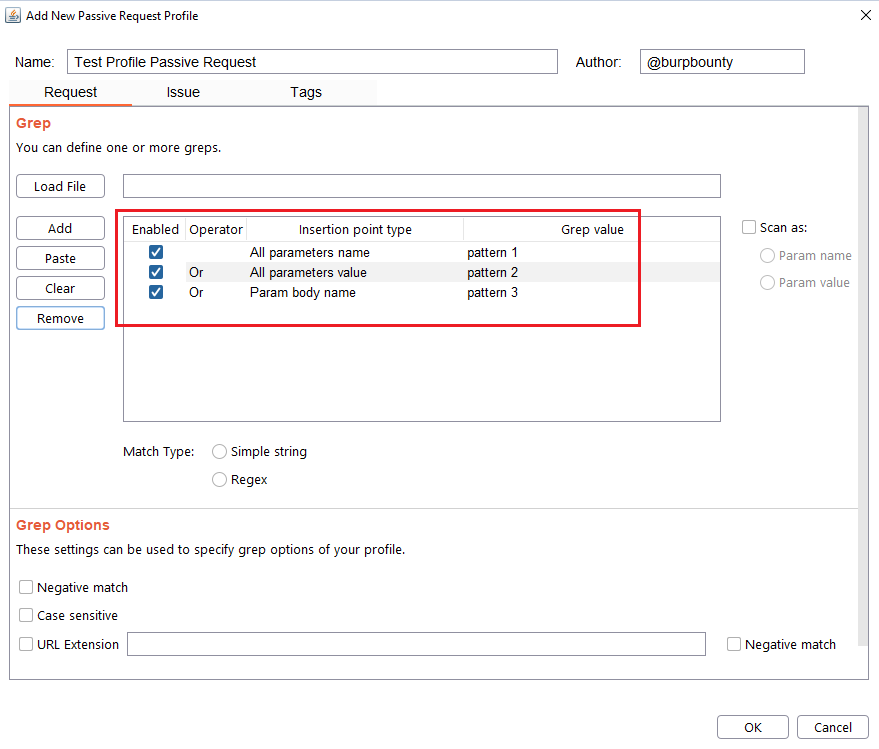
In this section you can choose in which insertion point you want to search for the pattern.
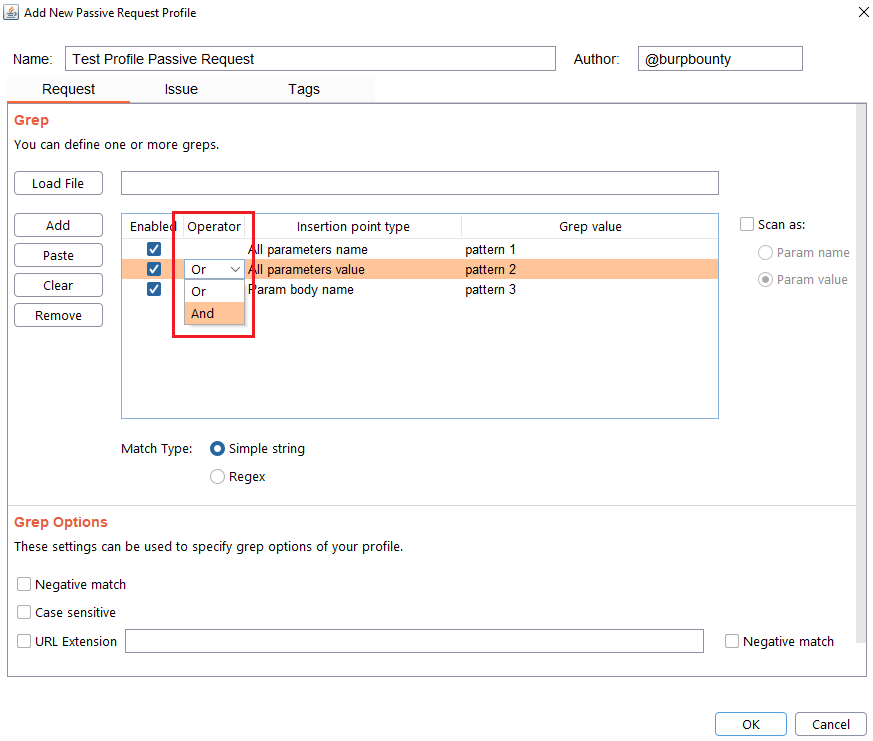
At the same time, the logical AND operator can be used when searching for a value. This allows us to further refine the profile and avoid false positives.
Step 3 (Optional): The passive request profile can be used for the Smart Scan. Two types of options:
- Param name: the insertion point type name will be scanned with the active profiles selected in a rule.
- Param value: the insertion point type value will be scanned with the active profiles selected in a rule.

Note, that this step is not necessary if you only want to look for a pattern in the request and that it shows you an alert.
Step 4 (Required): Specifies which type of pattern to search in the insertion point.
- Simple string
- Regular expression
In this section you specify, if in the insertion point you want to search for a simple string or a regular expression.

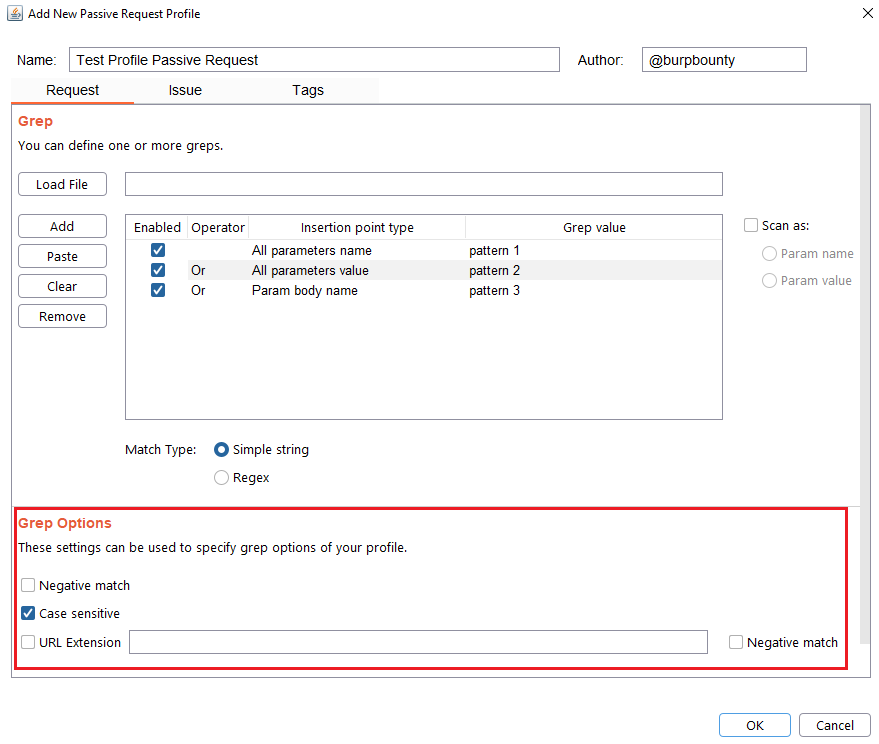
Step 5 (Optional): Grep options are specified.
- Negative match: It will show you the alert, if the pattern you have set is not present in the insertion point that you have chosen.
- Case sensitive: The pattern will be searched in the insertion point considering that it’s case sensitive.
- URL Extension: It will only search for patterns if the extension of the URL to which the request is made, matches the extension or extensions specified in this field (for example, php or jsp, etc) or if it doesn’t match (negative match checkbox)
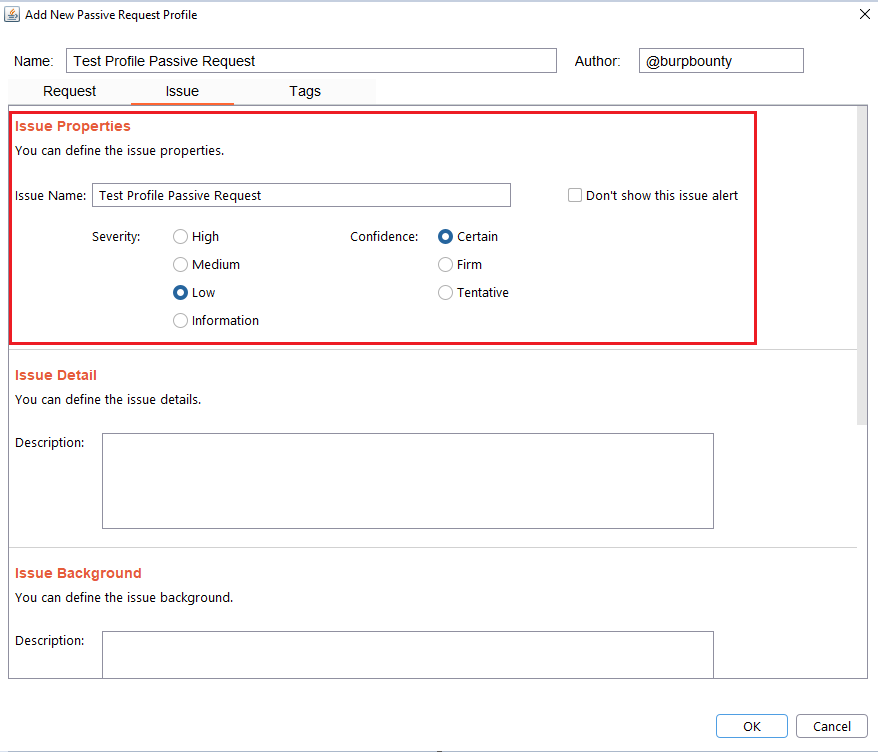
Step 6 (Required): It specifies the name that will appear in the alert and the criticality of that alert.
It’s necessary for the issue to appear, give it a “Issue Name” and complete the two fields, both the “severity” and the “confidence”. The issue descriptions are optional.
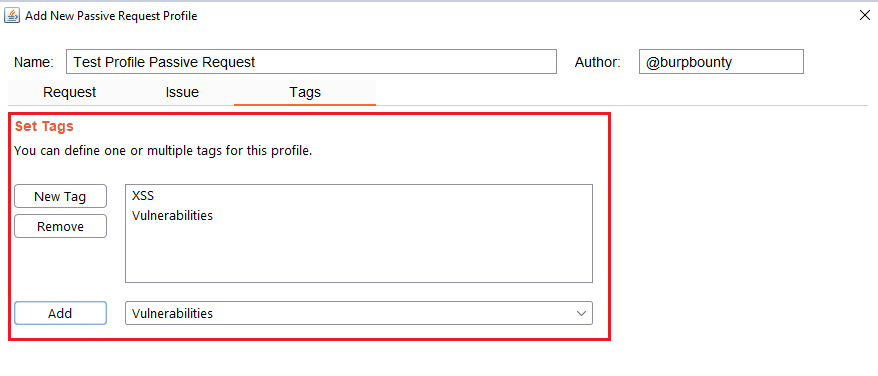
Step 7 (Optional): A tag is created and assigned to the profile. This is useful for better organization of profiles.
Passive Response Profiles
Burp Bounty Pro gives you the ability to create your own vulnerability profiles to the passive scanner.
- Passive Response Scanner: Look for strings/regex (or the absence of them) in HTTP response
Next let’s see how passive response profiles are created to look for something (or the absence of it) in the HTTP response.
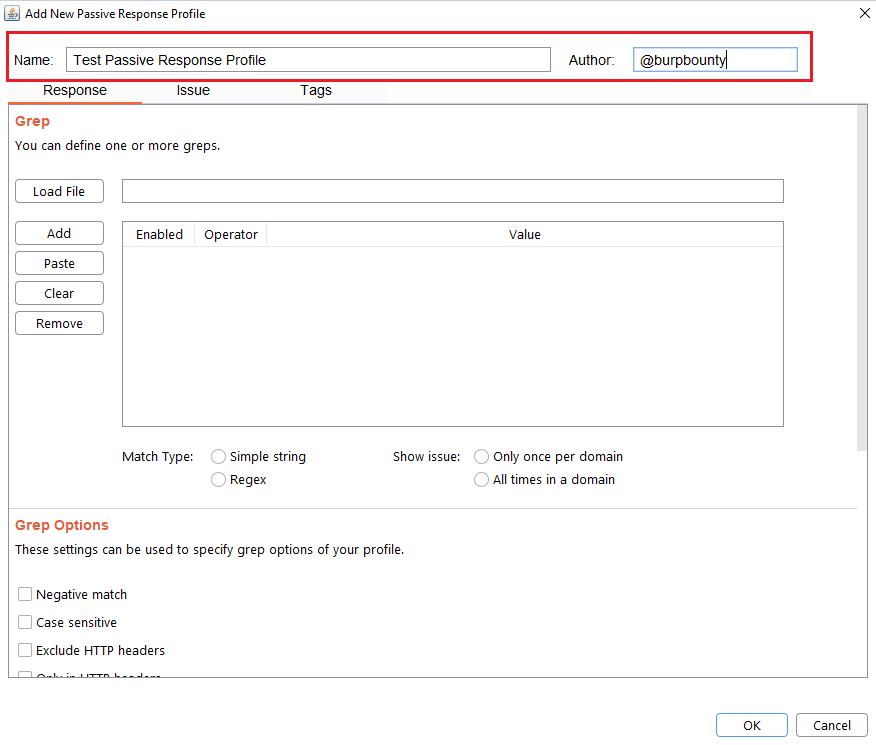
Step 1 (Required): The name and author of the profile are first set.
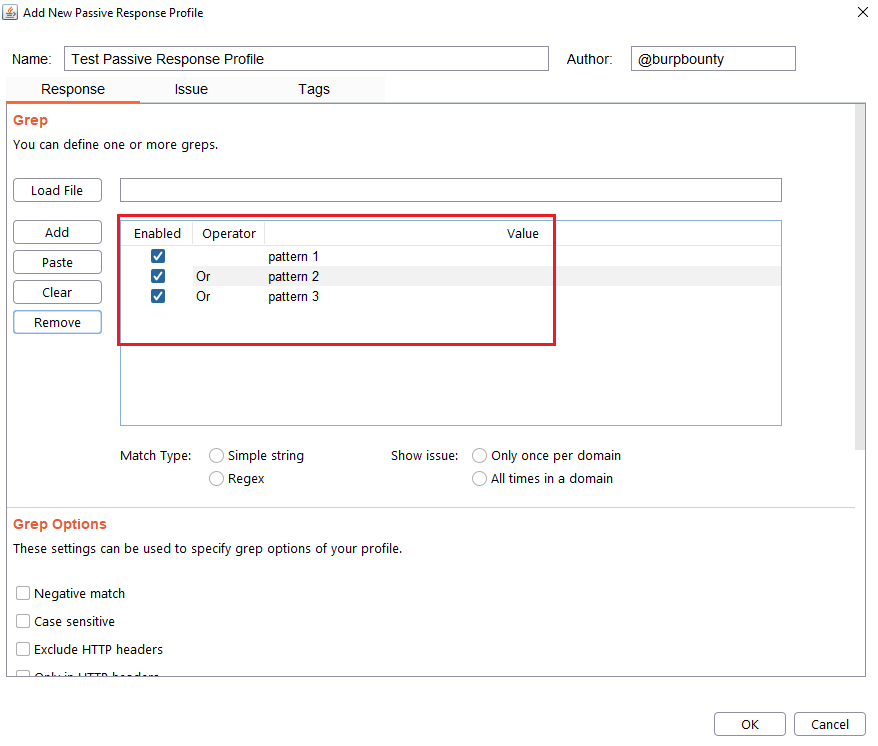
Step 2 (Required): It specifies the pattern or patterns to look for in the HTTP response.
- You can add the pattern by click on the “add” button and modifying the value, or by pasting it directly with the “Paste” button if you already have it in the clipboard.
- You can also load a patterns file (one per line) with the “Load file” button.
- At the same time, the logical AND operator can be used when searching for a value. This allows us to further refine the profile and avoid false positives.
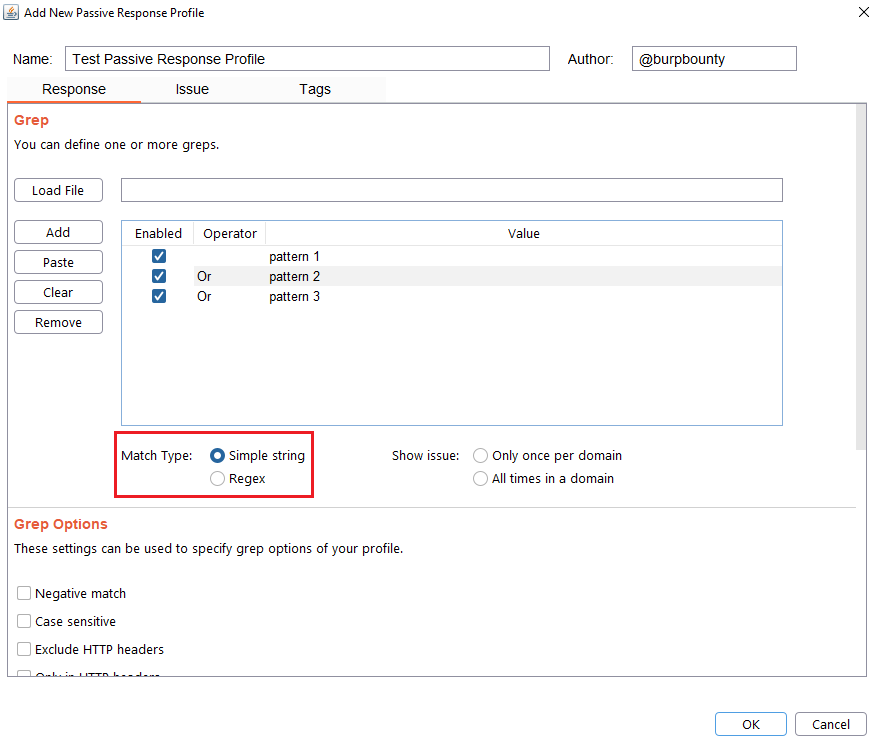
Step 3 (Required): Specifies which type of pattern to search in the response.
- Simple string
- Regular expression
In this section you specify, if in the insertion point you want to search for a simple string or a regular expression.
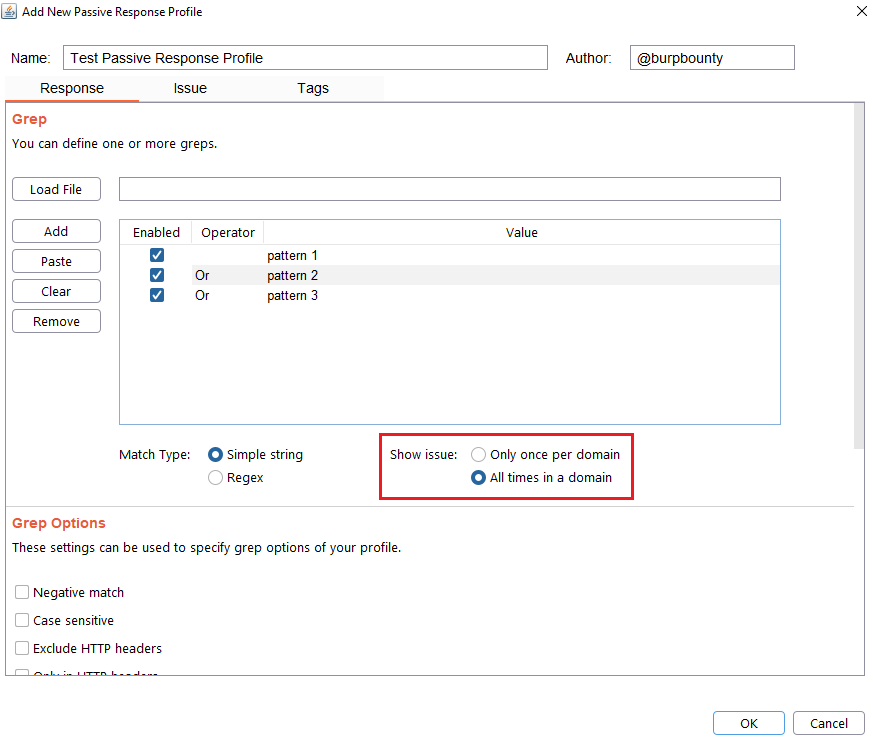
Step 4 (Optional): Specify how many times this issue will be displayed for one domain.
- Only once per domain: Only once time for all HTTP responses in one domain.
- All times in a domain: Every time that the pattern is detected in the domain HTTP responses.
Step 5 (Optional): Grep options are specified.
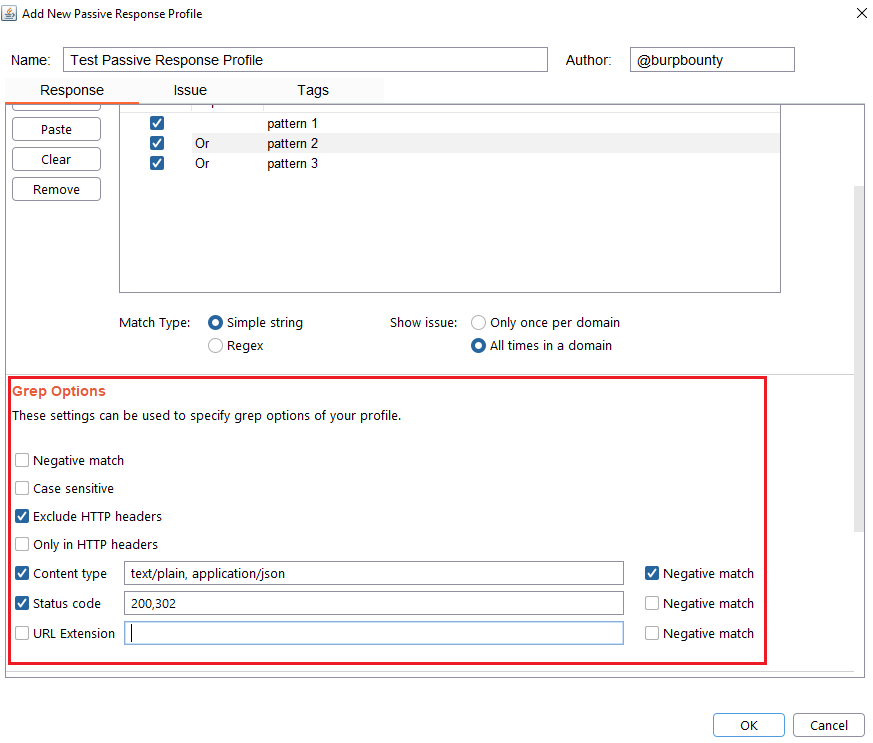
- Negative match: It will show you the alert, if the pattern you have set is not present in the HTTP response.
- Case sensitive: The pattern will be searched in the HTTP response considering that it’s case sensitive.
- Exclude HTTP headers: The pattern will NOT be searched in the HTTP headers. (Only in the body of the HTTP response)
- Only in HTTP header: The pattern will ONLY be searched in the HTTP headers.
- Content type: The pattern will only be searched in the HTTP response if the content type of the HTTP response is equal to the “content type” field. You can specify multiple content types separated by commas. You can also specify that ONLY look for the pattern in the HTTP response if the content type is NOT equal to this field, marking the “negative match” checkbox.
- Status code: The pattern will only be searched in the HTTP response if the Status code of the HTTP response is equal to the “status code” field. You can specify multiple status code separated by commas. You can also specify that ONLY look for the pattern in the HTTP response if the status code is NOT equal to this field, marking the “negative match” checkbox.
- URL Extension: It will only search for patterns if the extension of the URL to which the request is made, matches the extension or extensions specified in this field (for example, php or jsp, etc) or if it doesn’t match (negative match checkbox)
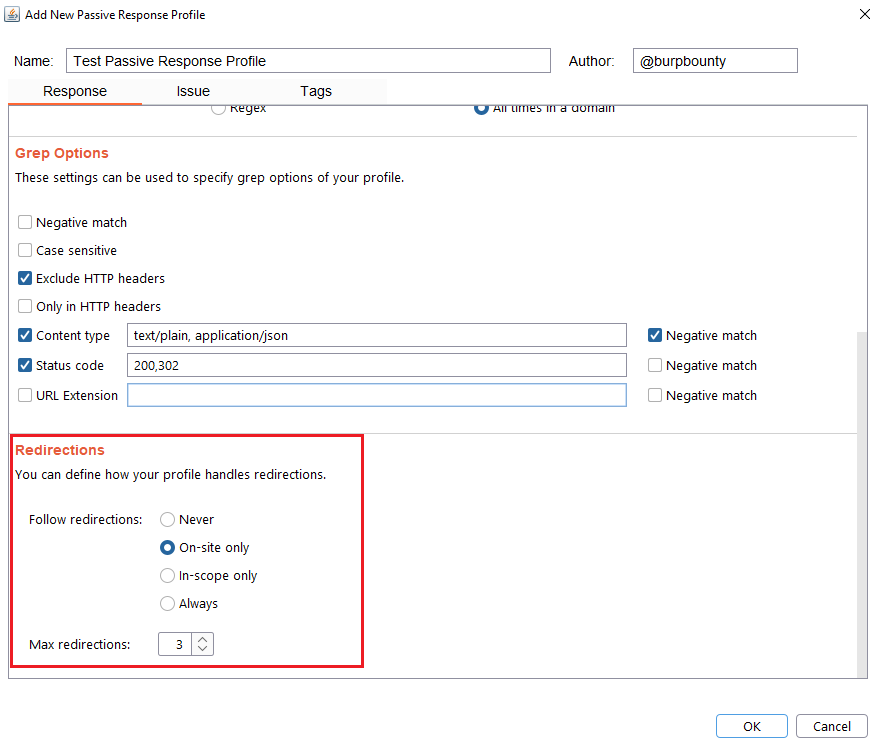
Step 6 (Optional): Redirection options are specified. You can choose between the following options:
- Never: As the name suggests, no redirect will be followed.
- On-site only: It will only follow the redirects that lead to the same site of origin.
- In-scope only: It will only follow redirects that lead to a domain that is in scope.
- Always: As the name suggests, it will follow all redirects.
Max redirections: In this field the maximum number of redirects that will follow is indicated.
Step 7 (Required): It specifies the name that will appear in the alert and the criticality of that alert.
It’s necessary for the issue to appear, give it a “Issue Name” and complete the two fields, both the “severity” and the “confidence”. The issue descriptions are optional.
If you check the option “Don’t show this issue alert” the alert will not be shown in the dashboard, it will only be used for the Smart Scan.

Step 8 (Optional): A tag is created and assigned to the profile. This is useful for better organization of profiles.